/chris de la rosa (Page 37)
Gluten Free Vegetarian

Delightful Coconut Curry Seim.

This was my first time planting Seim in my Canadian garden so as you can imagine I was very excited to not only make an awesome dish with it, but also share it with you all. While I did share a curry Seim recipe back in 2010 (I think), you’ll find subtle differences with this one.

You’ll Need…

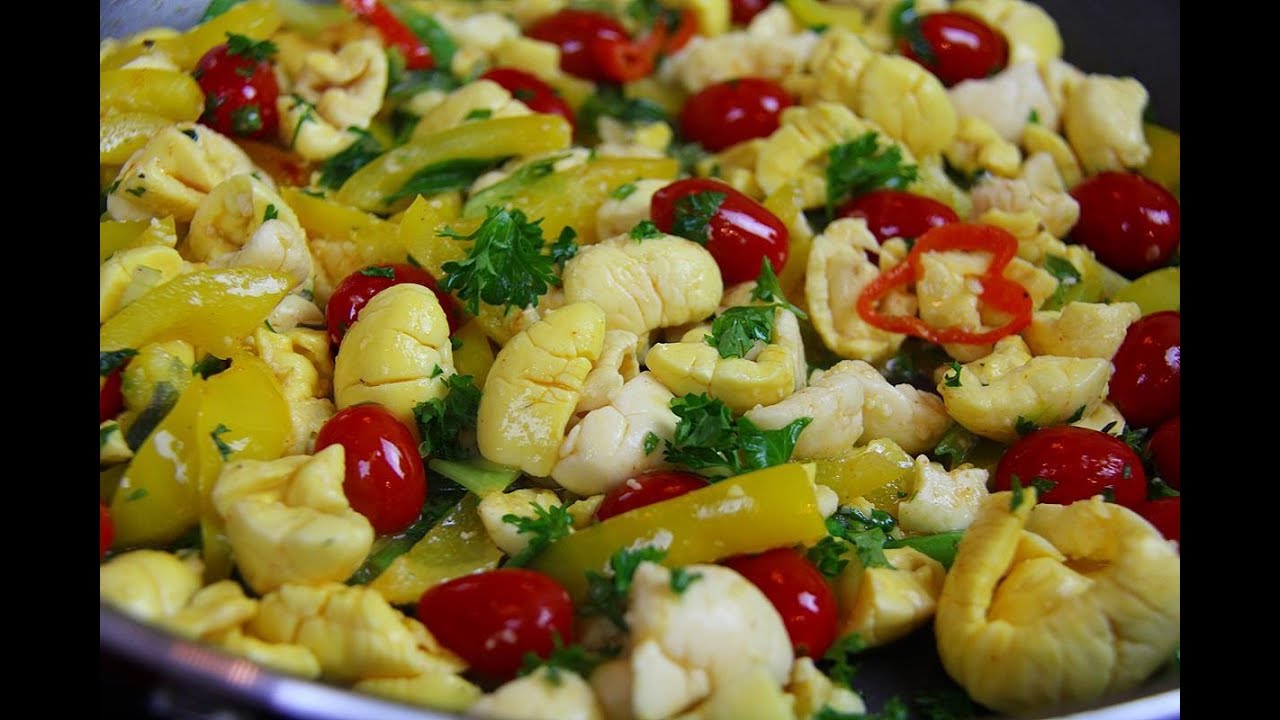
1 1/2 lbs Seim beans
1/2 medium onion (diced)
1/4 habanero pepper (sliced thin)
1 1/2 tablespoon Curry Powder
2 tablespoon veg oil
3/4 teaspoon salt
1/4 teaspoon black pepper
2 large cloves garlic (sliced or crushed)
1 pimento pepper (aka seasoning pepper)
1 teaspoon Caribbean Green seasoning
2 tablespoon coconut cream
3/4 cup water
4 medium potatoes (cut into pieces)

Important! If doing this recipe gluten free make sure you go though the entire list of ingredients to make sure they meet with your specific gluten free dietary needs. Especially the curry powder you use, as some can contain flour as a filler in some cases.

We’ve got to prep the Seim. Wash and drain them, then remove the outer rib with a pairing knife (watch the video below). After-which, cut each Seim into 1/2 (or smaller if you wish). Prep the other ingredients.

Heat the oil (you may also use coconut oil if you prefer) on a low heat, in a wide and somewhat deep pan. Then add the garlic and cook for about 30 seconds, then add the curry powder – stir! Maintain a low heat to bloom the spices which makes up the curry powder – it will go darker and clump. Cook for 3-4 minutes to cook off the rawness of the curry.

It’s now time to turn up the heat to med/high and add the prepped Seim. Stir well. We want to degalze the bottom of the pot and pick up all that curry goodness.

Now add the onion, habanero (any hot pepper you like), pimento pepper (optional as they’re almost impossible to find outside the southern Caribbean), black pepper, salt, Caribbean Green seasoning and coconut cream (use less water if using coconut milk – 1/2 cup coconut milk if that’s the case). Then go in with the water and stir well.

Add the potato pieces and bring to a boil. Then reduce the heat to a simmer, place the lid on and let it cook until tender and the water is burned off.

25 minutes later you will have everything tender, moisture gone and your kitchen will have the lovely aroma of a good vegan curry. Add the chopped tomato, stir and take off the heat. You’re done. Allow the residual heat to finish cooking the tomato.

Remember to taste for salt and don’t forget the golden rule – wash your hands with soap and water immediately after handling such hot peppers as Habanero. A tasty vegetarian curry that’s very unique in flavor from the Seim and it goes well with HOT Sada or Buss Up Shut roti.

If you can, please support. And should you have questions about this recipe or anything food related, be sure to Ask Chris.

vegan ackee and saltfish
Gluten Free Vegan

Tasty Vegan Ackee And Saltfish.

Confused yet? I know the title says Vegan, but Saltfish! The simple explanation is… the classic dish is called Ackee and Saltfish in Jamaica, so I felt it was the easiest way to pay tribute to this national dish, while still keeping it vegan (and gluten free) friendly. Make sense yet?

You’ll Need…

1 can Ackee (washed/drained)
1.5 tablespoon coconut oil
1 bell pepper (sliced in thick strips)
1/2 scotch bonnet pepper (sliced thin)
3 cloves garlic (diced fine or crushed)
3 scallions (chopped)
4 sprigs thyme (leaves)
2 tablespoon parsley (chopped)
1 cup cherry or grape tomatoes (any tomato will work)
1/2 teaspoon hot smoked paprika
1/4 teaspoon salt
1/4 teaspoon black pepper

Important! If making this recipe gluten free be sure to go through the entire list of ingredients to make sure they meet with your specific gluten free dietary needs.

Since I live in Canada I have no choice but to use the ackee found in a can. This canned ackee is pre-cooked and in a salty brine solution. Drain the brine, rinse with cool water and set aside to air dry as we prep the other ingredients.

Heat the coconut oil in a wide pan on a low heat then add the scallions and bell pepper. Stir well then add the garlic, black pepper and scotch bonnet pepper. Remember to wear gloves and wash your hands with soap and water after handling the scotch bonnet pepper (and don’t include any seeds nor the white membrane around the seeds, unless you want the raw heat) .

Cook on the low heat for two minutes then add smoked paprika, tomato (I cut the grape tomatoes in 1/2) and parsley. I find that the slight smoky heat from the paprika reminds us of the Salted Cod which is traditionally used in this recipe in Jamaica. Cook a further 2 minutes.

For even more flavor, it’s time to go in with the thyme leaves and the salt. Your heat is still on low – cook another 2 minutes. Then gently add the Ackee to the pan. Be VERY Gentle please. Stir well to mix all the flavors.

Since the Ackee will be precooked, all you have to do is make sure it heats though and you’re done (about 3-4 minutes).

Taste for salt and adjust if necessary, then get ready to enjoy a lovely vegetarian version of Classic Jamaican Ackee and Saltfish.

If you can, please support. And should you have questions about this recipe or anything food related, be sure to Ask Chris.

Recipe Card

Difficulty: Beginner Prep Time 20 mins Cook Time 20 mins Total Time 40 mins

Description

A plant-based take on the iconic Jamaican dish, blending creamy ackee with flaky hearts of palm in a savory, spicy sauté.

Ingredients

Instructions

Video
  1. Heat coconut oil in a large skillet over medium heat. Sauté garlic, onion, and bell pepper until softened, about 5 minutes.
  2. Add tomatoes, scotch bonnet, and thyme leaves, and cook another 3 minutes.
  3. Gently stir in ackee and hearts of palm. Cook for 5–7 minutes until warm and blended.
  4. Season with salt, pepper, and optional kelp flakes.
  5. Stir in scallions, cook 1 minute more, then remove from heat. Serve hot.
Tell us what you think
Meat & Poultry

Quick And Tasty Ham Fried Rice Using Leftovers.

Fried rice and leftovers goes hand in hand. I can’t tell you the joy I feel in my soul when I see leftover rice in the fridge. This time around along with the rice, I remembered that there was ham in the freezer from last Thanksgiving. So I give you, my quick, easy and delicious Ham Fried Rice.

You’ll Need…

2-3 cups cooked rice (chilled)
2 scallions (chopped)
1 clove garlic (diced fine or crushed)
1/4 habanero pepper (optional – fine dice)
1 tablespoon light soy sauce
3/4 tablespoon oyster sauce
3/4 cup peas (I used frozen)
1 tablespoon vegetable oil
1 pimento pepper (seasoning pepper – diced fine)
1/2 carrot (1/2 cup diced)
1 cup diced ham

Time to prep the ingredients as this is a very quick recipe and we need everything handy.

Heat the oil on a medium/high heat in a wide pan (I used my wok, but you can use a frying pan or skillet if you like) then add the cubed ham (I had it thawed) and cook for 2-3 minutes. Since the pieces of ham was a bit fatty, I wanted to render down some of that fat to add additional flavor to the completed fried rice.

It’s now time to add the frozen peas followed by the pimento (use bell peppers if you can’t source Pimento peppers) and habanero pepper .. 30 seconds later add the garlic followed by the oyster sauce and stir well. Remember to wear gloves when handling such hot peppers as Habaneros and do wash your hands after with soap and water. Also remember that the seeds and white membrane around the seeds will be packed with raw heat.

May I recommend that you use chilled rice or at least day old rice as you will get a much more grainy texture to your finished dish. Add the rice, followed by the soy sauce and mix well.

Basically all you need to do is make sure the rice heats through (about 3-4 minutes). I did cook my rice with salt, so the sodium from the soy sauce is enough to season this perfectly for me. Adjust with added salt if you need to.

Turn off the stove and top with the scallions.. You’re done! This is why I LOVE fried rice. Quick, simple ingredients and an outstanding one-pot meal.

If you can, please support. And should you have questions about this recipe or anything food related, be sure to Ask Chris.

Meat & Poultry

The Ultimate Chicken Tikka Masala.

Two clarifications to make before we get to the recipe. 1. There’s ABSOLUTELY nothing “Caribbean” about this recipe. However I was challenged to share this Chicken Tikka Masala reccipe via Instagram and I also believe it would be something which would fit naturally within our diverse culinary landscape. And 2. …don’t spend too much time analyzing the bold title – I do stand behind the recipe 100% though (smile).

You’ll Need…

3-4 lbs chicken (boneless chicken thighs)
1 1/2 tablespoon veg oil
1 teaspoon crushed garlic
1 tablespoon grated ginger
3/4 tablespoon salt
1/4 teaspoon black pepper
3/4 cup plain yogurt
1 tablespoon garam masala
1 teaspoon cardamon (about 5 pods)
1 teaspoon coriander seeds (or powder)
1 teaspoon cumin seeds
1 tablespoon turmeric
1 tablespoon chili powder
2 tablespoon clarified butter (ghee)
1 large onion (diced)
2 medium tomatoes (diced finely – almost like a thick paste)
1 1/4 cup coconut milk
1 tablespoon honey
1-2 tablespoon cilantro (chopped finely)

It’s time to season and marinate the chicken pieces. First off I placed the coriander seeds, cumin and cardamon pods in my spice grinder and created a powder. Feel free to use powdered coriander, cumin and cardamon if you don’t have a spice grinder. A stone mortar and pestle will work as well.

Place the chicken in a large bowl and add the salt, black pepper, yogurt, coriander, cumin, cardamon, turmeric, chilli powder, garam masala, ginger and garlic. Then mix in the veg oil and marinate for 2 hours in the fridge.

It’s time to get started cooking. I’d recommend taking the marinated chicken out of the fridge about 15 minutes before we start here, as to get it up to room temperature. Add the clarified butter to a deep/wide pan over medium heat. Then add the pieces of seasoned chicken and cook/brown for about 10-13 minutes (flip). You may need to do this in two batches.

Set the chicken aside to cool a bit. There should still be fat in the pot (if not add more clarified butter). Adjust the heat to low, then add the diced onion (if you want to add more garlic and ginger here, you may). Add the tomato paste and diced tomato after 2 minutes.

Cook on the low heat for 2-3 minutes, then add the coconut milk. In most recipes you’ll see people use cream, but being from the Caribbean… you knew I’d rock the coconut milk. I almost forgot (IMPORTANT) add the coconut milk to the bowl you marinated the chicken in and swish it around to pick up any remaining spices etc. Then add to the pot. Raise the heat to bring to a gentle boil.

The chicken should be cool enough to handle now, cut into serving size pieces and get ready to add to the pot once it comes to a boil.

Stir well after adding the chicken to the pot, then reduce the heat to a simmer and cook for about 5-8 minutes. Basically until all the flavors and textures combines nicely and you get a consistency to the gravy you’re happy with. Due to the slight acidity from the tomatoes, I like adding a bit of honey (or brown sugar) at this point.

Taste for salt and adjust to your own liking, then top with the chopped cilantro. Do remember that the gravy will thicken more with the residual heat from the pot.

My take on the classic Chicken Tikka Masala. Succulent pieces of chicken, in a rich gravy.. just screaming for some hot roti! If you can, please support. And should you have questions about this recipe or anything food related, be sure to Ask Chris.

Recipe Card

Difficulty: Intermediate Prep Time 2 hrs Cook Time 30 mins Total Time 2 hrs 30 mins
Servings: 6

Description

This dish features marinated chicken tikka pieces simmered in a creamy, spiced tomato-coconut sauce; rich, comforting, and infused with island-inspired flavor.

Ingredients

Instructions

Video
  1. In a bowl, combine yogurt, ginger, garlic, garam masala, turmeric, cumin, coriander, chili powder, cardamom, salt, and pepper. 

  2. Add chicken pieces, toss to coat, and marinate for at least 2 hours or overnight.

  3. Heat oil or ghee in a skillet over medium. Add diced onion and sauté 3–4 minutes until soft.
  4. Add marinated chicken (reserve extra marinade), browning on all sides, about 5 minutes. Remove and set aside.

  5. Add tomatoes and reserved marinade to the pan. Cook 5 minutes, stirring, until tomatoes begin to break down.
  6. Return chicken to pan, stir in coconut milk and honey. 

  7. Bring to a gentle simmer, cover, and cook 15–20 minutes until chicken is cooked through and sauce thickens.

  8. Taste and adjust seasoning. Stir in cilantro before serving.
Tell us what you think
Meat & Poultry

Incredible Caribbean Fried Chicken (gluten free too).

Fried Chicken! There are as many ways to make this iconic dish as there are people who claim that their recipe is the greatest on the planet. While I won’t make such a bold statement, I will say this fried Chicken will rival and ‘better’ many of the recipes you’ve tried before. After-all my mommy taught me how to rock this one.

You’ll Need…

10-14 Chicken drumsticks
1 tablespoon Caribbean Green Seasoning
3/4 teaspoon salt
1/8 teaspoon black pepper
1/2 medium onion (grated)
1/2 teaspoon hot sauce (I used homemade Peppersauce)
1 teaspoon Curry Powder (madras blend)
1 1/2 tablespoon corn starch

To season the oil…

  • 5-8 sprigs of thyme
  • 2 scotch bonnet peppers
  • 1 head of garlic (cut in half – skin on)
  • 3-4 cups vegetable oil

TIP! Pre-heat the oil to 350ºF – While the chicken is frying, adjust the heat to maintain 325ºF in the oil.

It’s time to season and marinate your cleaned chicken drumsticks. In a large bowl or large zipper bag, add the chicken, Caribbean Green Seasoning, salt, black pepper, pepper-sauce, curry powder, corn starch (it will give the chicken a crispy finish) and grate in the onion. Mix well and set in the fridge to marinate for 2 hours (at least).

It’s time set up your frying station and heat the oil – heavy skillet and around med-high heat. Basically I have the seasoned and marinated chicken (room temperature now), the cast iron pan and a sheet pan with a wire rack and tongs.

You have 2 options here. As the oil heats, add the garlic, thyme and scotch bonnet peppers. Or as in my case, I added the first batch of chicken to the pan, then added the garlic, scotch bonnets and thyme. Do NOT over-crowd the pan with chicken pieces or the temperature of the oil will drop and you’ll get soggy/oily chicken. Do NOT over-fill the pan with oil – leave room for when you add the chicken pieces to fry. And DO NOT break the scotch bonnet peppers, or you will release the beast.

It will take between 15-20 minutes to cook the chicken (depending on the size of the drumsticks) all the way through and do remember that as the chicken cools it will go a bit darker in color. Set on to the wire rack to drain off any excess oil and if you want you can sprinkle on some additional salt while they’re still hot. Keep in mind that I’ve cut back on the amount of salt I use in my daily diet.

Such a simple yet delicious way to prepare fried chicken as we do in Caribbean. Try to not skip seasoning the oil as I did, this adds a wonderful flavor to the completed fried chicken.

Don’t forget to watch the video below. If you can, please support. And should you have questions about this recipe or anything food related, be sure to Ask Chris.

Crispy Porl Belly on a white serving dish sprinkled with scallions
Meat & Poultry

Crispy Chinese Style Pork Belly.

This dish brings back a ton of memories every-time I make it. I first shared this recipe back in 2018 on the YouTube channel and to this day it’s still a hit. As a young fella on the islands, Saturdays were reserved for attending Kung Fu movies at the local cinemas in San Fernando with my dad and younger brother. After-which dad would take us to a Chinese shop/restaurant on Mucurapo Street to have this same crispy pork belly – sandwiches. Loaded with pepeprsauce, ketchup and the odd time.. topped with chow mein. Real niceness!

You’ll Need…

3-4 lbs pork belly
2 tablespoon Chinese cooking wine
2 teaspoon sugar
1 teaspoon salt + 1 teaspoon for topping
1/2 teaspoon black pepper
1/2 teaspoon garlic powder
1/2 teaspoon onion powder
1 teaspoon 5 spice powder
2 tablespoon white vinegar

Important! Please try to get a piece of pork belly with a fair amount of lean meat and not too much fat. while you do need the fat, I find that too many times restaurants give us overly fatty crispy pork belly.

Make sure the pork is hair free (you may need to use a razor to remove any remaining hair on the skin). You now need to prick the skin of the pork so we get that crunch/crispy skin after it’s done in the oven. I used bamboo skewers to prick the skin (watch the video) but you can use anything with a sharp point – that can go through the skin (it can be tough). Try to prick as much of the skin as you can.

Then flip it over and make 1 inch (wide) cuts down the length of the flesh and about 1/2 inch deep (as in the pic below). here is where we’ll add the rub, so to add a ton of flavor to the completed dish.

First off, brush the Chinese cooking wine over the flesh side of the pork belly (not the skin) and into the cuts we made. Then make a mixture with the salt, black pepper, Chinese 5 Spice powder, sugar, garlic powder and onion powder and work into the flesh and cuts (NOT the skin).

Now flip it over and place in a bowl and into the fridge to air-dry overnight. Do NOT cover!

The next day, remove it from the fridge and let it come up to room temperature. Please pre-heat your oven to 400 F. Create a pouch with foil for the flesh side of the belly (see image below), with the skin exposed and brush the skin with the vinegar, then sprinkle on the remaining salt. Into the oven on the middle rack.

After 55 minutes, it’s time to crank up the heat in your oven to “broil” – which in my oven is 500 F.

Back on the middle rack – PLEASE keep an eye on things as this is where it can burn with the high heat. In my case the edges did char a bit, but small ting. It took about 7-10 minutes.

Allow it to cool, then flip it over and using the long cuts we originally made as a guide, slice though. then cut into bite size pieces.

A tribute to my childhood and spending time with my dad and brother. Do give the recipe a try as I know it will be a hit in your home. If you can, please support. And should you have questions about this recipe or anything food related, be sure to Ask Chris.