/chris de la rosa (Page 3)
Bok choy and corned beef in pan
Gluten Free Meat & Poultry

Bok Choy with Corned Beef.

This Bok Choy (Shanghai Bok Choi) recipe is loosely based on the way mom would make her Fry Pak Choi With Saltfish as well as her classic Fry Pak Choi with Stewed Pork, we grew up enjoying with Sada Roti. In this version we’re simply using leftover Corned Beef (bully beef) I had from dinner a couple nights ago.

You’ll Need…

1/2 cup leftover fried corned beef
1 tablespoon olive oil
1 medium onion (sliced)
3 lbs shanghai bok choy
1/2 teaspoon black pepper
1/2 teaspoon sea salt (adjust)
8-10 grape tomatoes (1/2)

Notes. Please use the video below to follow along as much more about the recipe is discussed there. If making this dish gluten free, please go through the full list of ingredients to ensure they meet with your specific gluten free dietary requirements. Especially the canned corned beef that’s used.

Heat the olive oil is a wide pan on a medium flame then add the leftover corned beef. As it heats up, add the sliced onion and stir well. Should you want to add crushed garlic and spicy peppers, do so now.

Three minutes later add the white parts of the Bok Choy (as explained in the video) to the pot and stir well. Cook for 4-6 minutes. Do not cover the pan/pot.

While the corned beef will have a sodium element to it, you’ll still need to add more salt (as I did at this point).

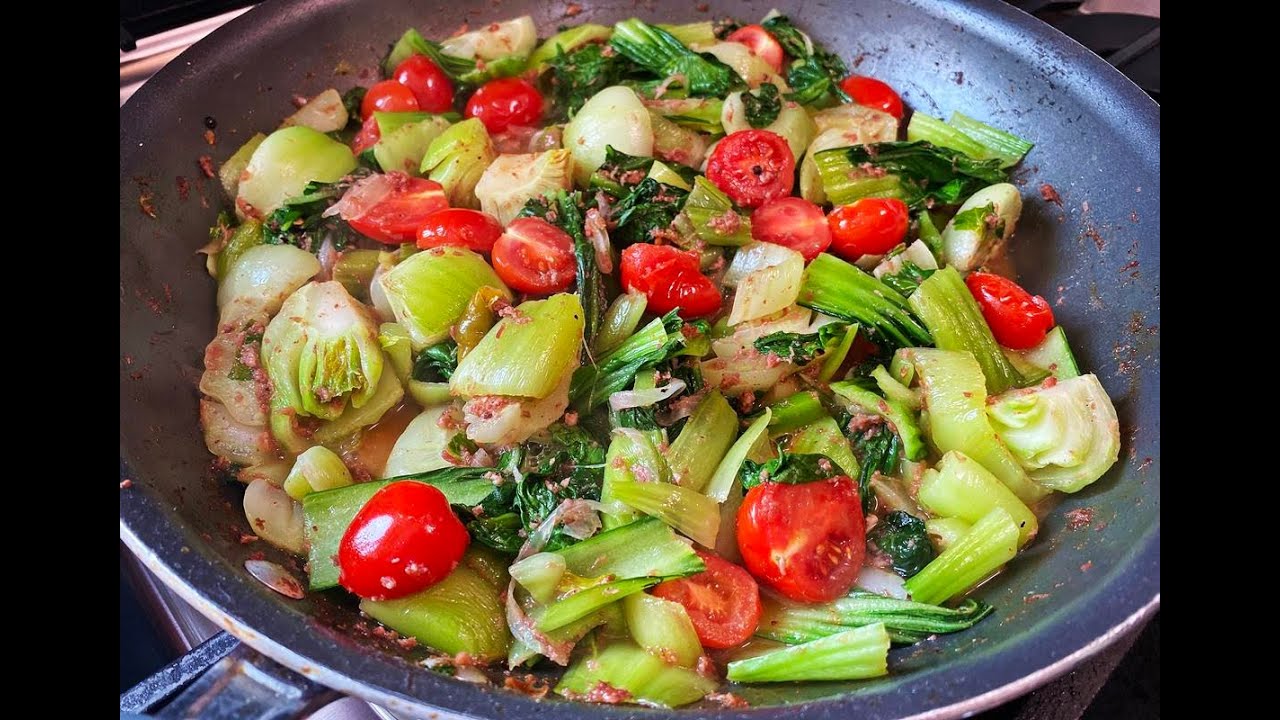
It’s now time to add the green parts and stir well. Please note that traditionally we’d chop everything MUCH smaller but as explained in the video, I wanted this dish to take on a sort of stir fry feel.

Top with the tomato and cook for 3-4 minutes. However I like a slight crunch to my Bok Choy, so with that in mind you may cook longer. Mommy would cook this until all of the liquid was gone.

Remember to taste and adjust the salt to your liking.

Recipe Card

Bok Choy with Corned Beef

Difficulty: Beginner Prep Time 10 mins Cook Time 15 mins Total Time 25 mins
Servings: 4

Description

A quick and flavorful Caribbean stir-fry combining tender bok choy and savory corned beef, perfect for a satisfying meal.

Ingredients

Instructions

Video
  1. Heat the olive oil in a wide sauté pan over medium heat. Add the leftover fried corned beef and sliced onion to the pan. Stir well and cook for about 3 minutes until the onions are translucent.

  2. Add the white stalks of the bok choy to the pan. Stir to combine and cook for 4–6 minutes, uncovered, until the stalks begin to soften.

  3. Season with sea salt and black pepper, adjusting to taste.

  4. Add the green leaves of the bok choy to the pan. Stir well and cook for an additional 2–3 minutes until the leaves are wilted but still vibrant.

  5. Top the dish with the halved grape tomatoes. Cook for another 3–4 minutes, allowing the tomatoes to soften slightly.

  6. Taste and adjust seasoning if necessary. Serve hot.

Tell us what you think
Gluten Free Meat & Poultry

Yellow Split Peas Dhal With Salted Pigtail.

Traditional Caribbean Dhal is something that’s close and dear to me, a dish which takes me back to being a lil fella on the islands. While mommy didn’t cook curry very often, the days after school when we’d come home to Rice, Dhal and Curry (you may say curried) Chicken, was something we (brother and sisters) all looked forward to. This is not that recipe, however it’s just as comforting and with pieces of leftover Sada Roti soaked in it – BOOM! My childhood right there.

12-15 cups water
2 1/2 cups yellow split peas (washed)
1 tablespoon turmeric (sorfran)
1 1/2 lbs salted pig tail (prepared)
1 medium onion (sliced)
10-12 cloves garlic (divided)
3 Bird’s Eye Peppers (optional)
3/4 teaspoon black pepper
3/4 teaspoon salt (adjust)
2 tablespoon olive oil
1 teaspoon geera seeds (cumin)

Notes! May I recommend that you follow along with the video below as much more about the recipe is discussed there, including why you must pre-boil the salted pig tail pieces prior to adding it to the dhal. If making this recipe gluten free, please go through the full list of ingredients to ensure they meet with your gluten free dietary requirements.

Prepare the Salted Pigtail Pieces. Basically get your butcher to cut the tails into 1 inch pieces, then after a good rinse you’ll place them in a deep pot covered with water and bring to a boil. Cook on a rolling boil for 40-50 minutes. Drian, rinse and set aside. This step will help to remove most of the salt it was cured in and to tenderize them a bit (they will be tough).

Add 12 cups of water in a soup pot on a high flame. As it comes to a boil add the washed yellow split peas along with the turmeric and stir well. Bring back to a boil.

On a rolling boil you will see foam accumulate at the top. Skim and remove. Then add the onion, 1/2 of the garlic, Bird’s Eye peppers (use any pepper you like or can source and in the amount you can handle) and black pepper. Do not add the salt yet (explained in the video).

When it comes to a boil reduce the heat to a simmer. Add the pieces of prepared salted pigtail and cook for 70 minutes or until the peas and pigtail pieces are tender. Stir every 15 minutes or so.

Along the way you will need to add more water. In my case it was a further 3-4 cups. Do keep in mind that this will yield a huge quantity of Dhal. I purposely make a big batch with the intention of freezing the leftovers. For those days I get a Dhal craving but don’t want to spend hours cooking.

At this point you’ll need to taste and add salt as needed (to your liking), then remove the pieces of salted pig tails (hopefully they are tender).

If you watch the video you’ll see me use a traditional wooden swizzle stick to break down the cooked peas to a smooth finish. If using a stick blender may I recommend you hit the pulse a few times to avoid creating foam, from going continuous. Add back the pieces of salted pig tail to the pot.

Heat the oil in a frying pan along with the remaining garlic (smashed) and geera (cumin) seeds. Yes you want the garlic to slightly burn and the oil to be smoking hot.

Being VERY careful, pour this mixture into the pot of dhal and stir well. In the video I explained the proper technique for this step, which is called “Chunkay”.

As a soup or a side to curry dishes, this Dhal is insanely delicious.

If you were to search Dhal in the search box above or visit the Recipe Index you’ll find 4-5 other versions of Caribbean style Dhal recipes… if pork is not your thing. If you wanted to add some Green Seasoning as it cooks, feel free to do so. A tablespoon will give it a lovely herbal undertone.

Gluten Free Seafood

Sardines In Tomato Sauce.

I was only exposed to this dish after moving to Canada, however in speaking with my mom recently she mentioned that she did use canned (tin) sardines in tomato sauce. Apparently we hated the tomato sauce, so she never included it in the meals she would make for my siblings and I. She also spoke about my younger brother’s curry recipe, he makes with these same sardines in tomato sauce.

1 tablespoon coconut oil
1 medium onion (sliced)
2 scallions (chopped)
1 bell pepper (chopped)
1 small Scotch Bonnet pepper (green)
3 sprigs thyme
3/4 teaspoon curry powder
1/2 teaspoon black pepper
1/2 teaspoon sea salt (your fav salt)
1/2 cup water
2 medium tomatoes (wedges)
1 large can sardines in tomato sauce
1/2 lemon (juice)
2 tablespoon chopped parsley

Notes! May I recommend you follow along with the video below as much more about the recipe is explained there. Including why I like a green Scotch Bonnet pepper and how adding a bit of crushed garlic and can enhance this dish further. If making this dish gluten free, please go through the full list of ingredients to ensure they meet with your specific gluten free dietary needs.

Open and pour the can of sardines in a large bowl, then separate the sardines from the tomato sauce and reserve. The following step is optional. Split each sardine lengthwise in half and remove (discard) the middle bones of each fish. Be gentle.

Heat the coconut oil (use your fav oil) in a wide saucepan on a medium flame, then add the bell pepper, onion, scotch bonnet and scallions. Turn the heat to med/low and cook for 3 minutes.

Then add the black pepper, thyme and curry powder and cook for a further 2 minutes, before adding the reserved tomato sauce.

Rinse the bowl with the tomato sauce with the water and add that water to the pan. Stir well and add the salt. Bring to a simmer (medium heat) and cook for 3 minutes.

At this point add the chunky pieces of tomato, stir (gentle – explained in the video) and cook for 2 minutes before adding the sardine fillets.

Be very gentle when adding the sardine fillets or they will fall apart on you.. unless that is what you want (chunky pieces). Spoon on the sauce over the fish, reduce the heat to a simmer and cook until it heats through.

Three minutes later you may taste and adjust the salt to your liking, add the lemon (or lime) juice and top with the chopped parsley. Turn off the stove. You can always add more water if you find that the sauce is overly thick.

When my Guyanese friends introduced me to this dish, they served it with steaming hot rice. Personally I enjoy it with Sada Roti, slices of avocado (zabouca) and with peppersauce on the side.

Gluten Free Seafood

Fry Ochro (Okra) With Shrimp.

About 12 years ago I shared my original take on Okra With Shrimp, and while that recipe is still very popular, I thought I’d share another version with slight differences with you. One of the most common questions I received after sharing a quick Reel on Instagram was, “can I use pre-cooked shrimp?“. The short answer is yes, however you won’t get much (if any) flavor from them.

2 lbs okra (trimmed)
3/4 lb small shrimp (washed, peeled, deveined)
1 lemon (juice)
3 tablespoon olive oil (divided)
1 teaspoon Caribbean Green Seasoning
3/4 tablespoon salt (divided)
3/4 tablespoon black pepper (divided)
1 teaspoon curry powder
1 medium onion (sliced)
5-7 cloves garlic (smashed)
1 scotch bonnet pepper (optional)

Notes! I used an entire Scotch Bonnet pepper in the recipe, but you can use as much as you can handle or leave it out. May I suggest you follow along with the video below as much about the recipe is discussed there. If doing this recipe gluten free, please go through the full list of ingredients to ensure they meet your specific gluten free dietary requirements.

Season the cleaned shrimp with 1/3 of the salt, 1/3 of the black pepper, Caribbean Green Seasoning, Curry powder and 1 tablespoon of olive oil. Mix well and set aside as we prep the okra.

In the video I explained that I like to wash the okra (say ochro in the Caribbean) and allow them to air-dry for a bit before prepping. Which includes removing the stems and ends (discard), then cutting each into 1/4 inch pieces.

Using a dry non-stick (explained why in the video) on a medium flame, add the seasoned shrimp, stir and cook for 2-3 minutes. Then remove and set aside.

In the same pan add the remining olive oil and add the okra. Stir well, then add the remaining ingredients.

After about 25 minutes (try to maintain the same heat and stir every 5 minutes or so), the okra should have dark to golden edges and would have lost most of its moisture. As explained in the video, these dark edges bring out a lovely sweetness.

TIP! Use a wide non-stick frying pan to save on having to go heavy with oil and to avoid the okra pieces stacking up. This will create steam, which equals moisture and it will result in slimy okra.

Once you’re happy with the texture and color of the Okra, add the precooked shrimp back to the pan, stir well and cook for another 1-2 minutes.

Remember to taste and adjust the salt at the end, to your liking and may I recommend you have some hot Sada Roti on the side with this.

Seafood

How to Make Perfect Coconut Stewed Cod Fish Fillets.

Over the years I’ve noticed that fish and seafood recipes do really well on the website, maybe it’s due to the shift from more traditional pork, beef and chicken recipes and more exploration of pescatarian type dishes. While you may notice similarities with this recipe and the Coconut Stewed Fish I did back in 2009, with the additional step of starting with the puree of tomato, onion and garlic, the overall flavor is superb.

2 lbs Cod fillet (washed)
3/4 tablespoon sea salt (divided)
1 teaspoon black pepper (divided)
3/4 tablespoon Caribbean Green Seasoning
1 teaspoon curry powder
1 tablespoon olive oil
2 medium tomatoes (rough chop)
6 cloves garlic (rough chop)
1 large onion (rough chop)
1/4 cup water
1 1/2 tablespoon tomato concentrate puree
3/4 tablespoon smoked paprika
1 teaspoon grated ginger
2 cup coconut milk
2 tablespoon chopped parsley

Notes! May I recommend using a firm white fish like snapper, flounder, haddock, halibut or grouper (besides the Cod I used). And if you want it to hold its shape while cooking, get fillets with the skin on, on one side. Additionally you can use a whole fish, simply cut it into pieces, but be mindful of the bones. Please use the video below to follow along as much more about the recipe is discussed there.

Season the Cod (cut into 2 inch pieces) with 1/2 the salt, 1/2 of the black pepper, Caribbean Green Seasoning and curry powder. Set aside to marinate for about 10 minutes.

In a blender, puree the onion, tomato and garlic with 1/4 cup of water. Then heat the olive oil (use any oil you prefer) on a medium flame and as it comes up to temperature add that tomato puree to the saucepan.

As it starts to boil, lower the heat to med/low, add the ginger and smoked paprika and stir well. The goal is to cook this down until all of the liquid is gone. After a few minutes, add the tomato concentrate puree, remaining salt and black pepper and continue cooking.

It will take about 10-12 minutes to cook-down until you get a thick paste and you start seeing the oil we started with.

It will go a much darker red in color and by removing all of the liquid the natural sweetness of the tomato will shine through, along with the other flavors we added.

At this point you’ll add the coconut milk and bring back to a boil (raise the heat back to medium). Stir well to incorporate and cook on a rolling boil for 4 minutes to cook out the rawness of the coconut milk (see video).

It’s time to add the seasoned pieces of Cod fish to the saucepan and being very gentle, stir to make sure the pieces are all coated with the rich coconut tomato sauce.

It will take between 4-5 minutes for the fish to fully cook. You will notice that the Cod will start to flake and the sauce thickens. Top with the chopped parsley and turn off the stove. You may add the juice of 1/2 of a lemon if you wish.

Taste and adjust the salt just before you turn off the stove and should you prefer, you may add chopped cilantro (coriander) or Shado Beni (culantro) instead of the parsley. Additionally, if you want this dish spicy, you may add any hot pepper you like (at the start) and in the amounts you can tolerate.

Gluten Free Seafood

How To Make Delicious Curry Shrimp At Home!

The Ultimate Curry Shrimp is one of the most visited (used) recipes on the website ever since it was uploaded, and while it’s still very much relevant, I thought I’d share a version with some slight differences. Especially since I’m doing the ‘comfort food’ series on YouTube.

1 1/2 tablespoon olive oil
1 teaspoon cumin seeds (geera)
1 medium tomato (puree)
1 medium onion (puree)
6-8 cloves garlic (crushed)
1 teaspoon grated ginger
1 tablespoon Caribbean Green Seasoning
1 scotch bonnet pepper (cut in 1/4s)
1 1/2 tablespoon curry powder
3/4 tablespoon Anchar Masala
1 cup water
1 1/4 lb medium shrimp (peel / devein)
1/2 lime (juice)
1 tablespoon chopped parsley

Notes! May I suggest you follow along with the video below as much more about the recipe is discussed there. Especially why I used puree tomato and onion and why I didn’t finish with Shado Beni (culantro) or Cilantro (coriander). If making this recipe gluten free, please go through the full list of ingredients to ensure they meet your gluten free requirements.

In a wide saucepan, heat the oil on a medium flame, add the cumin (geera) seeds and cook for 2-3 minutes before adding the pureed onion and tomato combo. If you don’t have a blender or magic bullet, you can chop both as fine as you can get them.

After about 3 minutes add the ginger, garlic, Caribbean Green Seasoning and Scotch Bonnet Pepper and stir well. No need for the hot pepper if you don’t want the curry shrimp spicy. However I did discuss the heat level and why I used a green Scotch Bonnet (not fully mature).

Stir well, then add the curry powder and anchar masala (use ground roasted cumin if you cannot source the anchar masala). Turn the heat down after another good stir and cook on med/low for 5 minutes.

After the spices which make up the curry powder has had time to bloom, add the water and turn the heat back up to medium. Bring to a boil and reduce by about 1/2.

It will take between 4-5 minutes. Peel and devein the shrimp (I left the tails on – optional) and wash with the juice of the lime (or lemon) and cool water. Add the shrimp and salt. Cook for about 3-4 minutes as we don’t want to end up with rubbery curry shrimp from over-cooking.

Taste and adjust the salt, top with fresh ground black pepper and parsley and shut off the stove.

You just mastered the art of cooking Excellent Curry Shrimp as done in the Caribbean, especially Trinidad and Tobago. ENJOY!