/Vegetarian (Page 4)
Gluten Free Side Dishes Vegetarian

Carilie (bitter melon) Mother In Law.

Mother In Law? If you’re not from Trinidad and Tobago or the other parts of the Caribbean you may not know what this dish is and why it’s called Mother In Law. I strongly believe the name stems from it being a VERY Hot n Spicy condiment.. the sort of trait we generally associate with one’s Mother In Law. But that would be a guess. Should you know a different explanation, please share in the comment section below. I know I said that the Roasted Pepper Choka was the ultimate condiment (side) to curry dishes, however this Carilie Mother In Law could also lay claim to that title.

You’ll Need…

2 Carilie
2 limes (juice)
2 medium carrots
5-8 chives
1 medium red onion
6 cloves garlic
3/4 teaspoon sea salt
1 scotch bonnet pepper
2 fatali peppers
1 pimento pepper (aka seasoning pepper)
6-10 leaves shado beni
1/2 cup white vinegar

Notes. With the Carilie (bitter melon) I explained in the video below that I had 1 which was fully mature (which was used in the food processor) and the other wasn’t fully mature (different flavor), which was sliced thinly. Ultimately the goal was to not only have different flavors from the Carilie, but textures as well. If doing this dish gluten free, please go through the full list of ingredients to make sure they meet with your specific gluten fre dieary requirements.

Carilie Momordica charantia commonly called bitter melon, goya, bitter apple, bitter gourd, bitter squash and balsam pear.

Give everything a rinse with cool water. Then rough-chop the onion, peppers ( I used Scotch Bonnet, Fatali and Pimento Peppers… use any HOT peppers you have available), carrots and chives. Please note that as explained in the video below, the Pimento pepper is not hot, but the flavor is simply amazing. If you can source it at you local West Indian market, may I recommend getting a couple.

With the mature Carilie, I cut it down the center, removed the inner seeds area with a spoon and gave it a rough chop as well. To make it easier work for my food processor. You may use a blender or hand-chop everything as it was traditionally done back in the day.

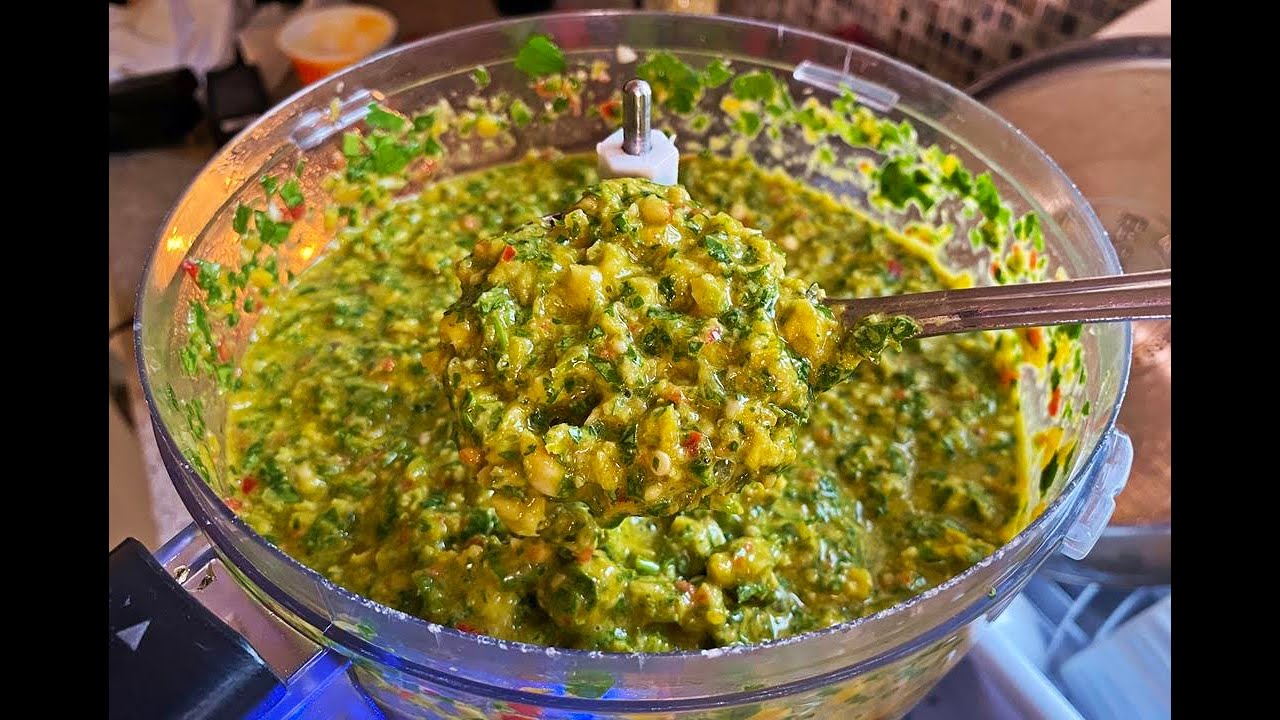
Place the onion, garlic, salt, peppers, carrots, shado beni (chadon beni) and chives into the food processor. I used a red onion as it’s much milder in flavor than the everyday onion, plus the red color makes it more attractive looking at the end.

Squeeze in the juice of the limes.

May I recommend that you pulse and not have it on a continuous speed or you may end up with a puree. This is supposed to have a bit of texture to it. Should you want to add more hot peppers do so, and remember to wear gloves and wash your hands with soap and water after handling hot peppers.

With the other (non-mature) carilie, cut it into 3-4 parts, then remove the core (see the video below), then slice as thinly as you can.

Mix everything together and add the white vinegar.

If you wanted to add another flavor to things (I prefer it like this) add a 1/2 teaspoon of ground roasted geera (cumin). Store in a container in the fridge for up to 2 weeks. Adjust the salt if you find that it’s overly tart. Another excellent side to curry dishes.

Are you a spicy Mother In Law?

Gluten Free Vegetarian

Delightful Curry Tomato.

Not necessarily a dish you’d find commonplace in the Caribbean and as I’ve explained in the video below, my take on this was born out of necessity (in my home). A combination of having pieces of tomatoes from the Preparing 25lbs of Tomato For the Winter post, and times when I have an abundance of tomatoes from garden. Vegan, Vegetarian, Ital and Gluten free, while not sacrificing taste.

You’ll Need…

3 tablespoon olive oil
1/2 teaspoon mustard seeds
4 cloves garlic (smashed)
1 medium onion (large chunks)
1/2 teaspoon black pepper
2 green peppers (watch the video)
1 tablespoon curry powder
2 cups tomato puree
3/4 teaspoon sea salt (adjust)
5 medium tomato in chunks
1 teaspoon tumeric
1/4 teaspoon ground cinnamon
3/4 tablespoon ground masala
3 tablespoon water
10 cherry tomato
1/2 cup chopped chives

  • Notes! If doing this recipe gluten free please go through the full list of ingredients to make sure they meet with your specific gluten free dietary requirements. Especially the curry powder you use as some commercial ones may contain fillers. I didn’t add any overly spicy peppers (scotch Bonnet), but you’re free to add if you want the finished curry to have a pronounced kick. Refer to the video below where I explain why I used 3 different types of tomato in the dish.

Heat the oil (you may use any oil you prefer) on a medium flame in a deep pot (I used a glazed clay pot I purchased at a Hispanic store at the Hamilton Farmer’s Market), then add the mustard seeds, followed by the garlic, onion and green peppers two minutes later. Top with the black pepper, crush the bay leaf (add) and turn the heat down to low. Gently cook for 4-5 minutes.

Add the curry powder and give it a good stir. Continue cooking on a low heat as we don’t want to burn the garlic nor the curry. Cook for 3 minutes, then turn the heat to medium and add the tomato puree. Basically I placed chunks of tomato into my bullet blender and created the puree – you may need to add a couple tablespoons of water.

Add the salt and cook on a medium flame to help the liquid in the tomato burn off. It will take about 8-10 minutes. Do remember to stir every few minutes. You’ll see the oil we started with start rise to the surface.

The base will be thick and chunky from the big pieces of onion and peppers. Add the chunks of tomato at this point, followed by the turmeric, cinnamon and ground masala. Should you want to add a teaspoon of brown sugar (if your tomatoes are tart) do so and toss in the 3 tablespoons of water. Bring to a boil, then reduce to a simmer.

Cook for 4-5 minutes on that simmer (don’t over-stir as we want to maintain some texture from the chunky pieces of tomato), then adjust the salt to your liking (taste). It’s now time to add the cherry tomatoes and chives. Yes, you may add chopped Shado Beni (culantro) or Culantro (coriander), but as explained in the video, I prefer chives as I want that finishing garlic/onion flavor note on my tastebuds.

Turn off the heat and allow the residual heat from this clay pot to soften the cherry tomatoes. You may cook for an extra minute or two should you wish.

A delightful vegan curry, with wonderful flavors and interesting textures from using tomato three ways. TIP! Instead of using water as I did, you may use coconut milk for a wonderful sweet and creamy undertone.

Gluten Free Vegetarian

Preparing 25 lbs of Tomato For Wintertime.

I LOVE Tomato Choka and if I’m being honest, I can probably have it everyday for the rest of my life. Such is the adoration I have for this tasty vegan dish. With that in mind and the fact that Canadian Winters can be severe, I try to process the tomato while the temperature is warm outside and when the local farmers are harvesting their summer’s crop. Fresh from the field tomato which are fire roasted makes a supreme Tomato Choka, even after being frozen. BTW have you tried my Tomato Choka Rice Soup yet? Make it happen!

You’ll Need…

25 lbs Roma Tomato (washed)
grill
food mill
freezer containers
large spoon
pairing knife
cookie sheet
tongs
bucket

Notes. I used 12 oz containers and the yield got me 12 containers to freeze. Watch the video for additional tips. I used Roma tomatoes as I find them to be more meaty (less water), contain less seeds and are a bit sweeter and not as tart as other varieties of tomato.

Wash and airdry the tomato and while you go through the box, check for those which are going bad (I lost about 5 lbs) and remove. Those ones (mom would be proud), I cut the pieces off which were still good and I plan do do a lovely curry with them in the coming days.

Using a pairing knife, remove the stems/stem area as it can be tough to break down later on. I’ll be using a food mill (refer to the picture below or video) but you may use a mortar and pestle (lots of work), food processor or blender. Be mindful that each option mentioned will give you a different finished texture and consistency. I used the largest grate (comes with 3 sizes) on the food mill, as I like my choka with a body.

Roast the tomatoes on a high heat. They took about 15 minutes to char perfectly and cook all the way through. Watch the video below for a few tips when grilling.

Yes you can broil (oven), stove top roast (messy), boil in water or microwave the tomatoes during the winter months, however NOTHING beats the flavor you get from roasting then over an open fire. Additionally, I paid $8.88 for 25 pounds of Roma tomato, which is incredibly cheap. During the winter the price can rage between $2 and$3.25 a pound in the supermarket. PLUS those are usually shipped from far distances (harvested green and sprayed with ripening inhibitors) or from closer green-houses (those taste like water). These tomatoes were grown in a field local to me and delicious from the summer’s sun.

You have a couple options now. Allow the tomatoes to cool and the skin will easily peel off before you break them down or as in my case, toss a few into your food mill and crank away. Coincidently the circumference of bucket I used (washed with soap and bleach first) fit the base of my food mill perfectly.

Be mindful that you’re working with hot tomatoes. Don’t risk getting burned.

It took a couple hours to work my way through the 25 pounds of tomato, as I had to stop to film, take pictures and set up shots. Basically it will take you much less time.

It’s just a matter of filling your containers and cleaning up at this point.

NO, do not add salt, pepper, onion etc at this point. May I recommend doing so fresh, when you make the actual choak in the months ahead. Yes, they will store for at least 6 months in the freezer.

Label the containers with the name of the contents as it can get confusing when frozen and they look like chilli or pasta sauce you may have in the freezer. Allow the roasted tomato sauce to COOL completely before you snap on the lids and stack them in the freezer. While you could use freezer zipper bags to freeze this (takes less space), I find these container stack better in my freezer and I’ve had instances when the freezer bags stuck together as they froze.

Thawing and Use. Remove from the freezer, place on your counter or in the fridge overnight, then place in a saucepan on a gentle heat (add a couple tablespoons of water if necessary), then proceed with making your tomato choka.

Gluten Free Sauces & Condiments Vegetarian

Pickled Bird’s Eye Peppers.

Over the years I’ve shared countless Peppersauce Recipes with you, and while this pickled bird pepper is not technically a sauce, in the Caribbean it would fall into that category. Yea, I grew up knowing these peppers (while a bit smaller in size) Bird Pepper (since birds would feed on them in your garden and later on the droppings would sprout pepper tress at the start of the rainy season) and not Bird’s Eye Pepper. We also had a variety known as Kiskedee peppers, named after the bird which would also feed on them.

You’ll Need…

1/4 lb red Bird’s Eye peppers
1/4 lb green Bird’s Eye pepper
4-5 Scotch Bonnet peppers
3- 3 1/2 cups white vinegar
4-6 cloves garlic (smashed)
1 teaspoon white sugar
3/4 teaspoon sea salt
1 teaspoon black peppercorns

Notes! Wear gloves when handling such hot peppers and wash you hands immediately after with soap and water. I opted to add a punch of HEAT with the Scotch Bonnet peppers.. that is optional or use any variety of hot pepper you enjoy or can source. I did cut them open so the vinegar could get into direct contact with the insides to add that KICK I wanted. If doing this recipe gluten free, please go through the full list of ingredients to ensure they meet with your specific gluten free dietary requirements.

Place the vinegar (yes, plain white vinegar) in a pot on a medium flame and add the peppercorns. As soon as you start seeing tiny bubbles on the edges, turn off the stove and let it steep for 5-10 minutes. The goal is to get the peppercorns to release it’s flavors with the warm vinegar.

As mentioned in the video below, I like adding a bit EXTRA HOT peppers to further add a kick to this pickle, as I make full use of the liquid on my grilled meats. I used 3 Scotch Bonnet and one Fatali peppers from my garden. They were cut in half.

Those cut peppers were added first to my jar (sterilized) followed by the red and then the green peppers. You may add them in any or no order as you like. I just find that it looks more attractive in the jar in this way.

Top with the salt and sugar .. if you want you may add a few wedges of lemon should you want a subtle citrus flavor to the pickle.

Tuck in the smashed garlic.

All that’s left to do is to pour the vinegar into the bottle and try and cover everything with it. Add a bit more vinegar should you need to.

FYI the green Bird’s Eye Pepper will have a different flavor and heat level than the red ones, since the green color signifies that they are not fully mature. Seal the bottle, give it a shake and store in a cool dark spot in your kitchen. It will last a few months. For a longer shelf life, store in the fridge. When removing the peppers, use a clean/dry fork or spoon.

If you wanted to add some sliced carrots in here, that would work. Additionally you may add a few cloves and/or some Szechuan peppercorns to change up the flavor profile a bit.

Gluten Free Vegetarian

How To Prep Eggplant For Wintertime Choka.

I spoke about my adoration for Baigan Choka in my cookbook and how it’s one of those dishes that takes me back to innocent days of being ah lil fella on the islands. Served with hot Sada Roti and a thick wedge of Zaboca (avocado) and a cup of warm Cocoa Tea or Milo. That is Comfort Food!

This is not a recipe post but about convenience and a means to save a TON of Money. Allow me to explain. Baigan (Eggplant, Melongene or Aubergine) Choka is BEST when the Baigan or Eggplant is fire roasted.. that’s a fact! Yes you can roast the eggplant in the oven or nuke it in the microwave, but the resulting Choka will not be the same. While the temperature is nice outside heading to the BBQ or Grill outside is not an issue, but winters in Canada can be VERY Harsh. The mercury dips below -40 C late January – early February. No one wants to go outside even for bread, milk nor eggs, yet alone grill eggplant.

Then there’s the cost of Eggplant (especially since COVID), at retail (in Canada) it can range between $1.99 to $3.50 a lb. However during the summer months (near the end of August) you can get bushels (or 1/2 bushel) when farmers are harvesting their summer’s crop at a reasonable rate. My basic math, I’d guess it ranges between .35 and .55 cents a lb.

You’ll Need…

grill (propane, wood or charcoal)
bulk eggplant
Scotch Bonnet peppers (optional)
pairing knife
couple spoons
tongs
baking trays (I used 1 large and 2 smaller ones)
bucket or rubbish pail
freezer containers
table to work on

While your grill comes up to a HIGH temperature (ranged between 550 F and 700 F), all you need to do is give each eggplant a few cuts (or stabs), especially the thickest areas. This will allow for quicker cooking and for the steam to vent as they roast.

Some people may decide to stuff those cut with slices of garlic, but I’m not a fan of that step. I much prefer to add my raw garlic when I assemble the dish later on.

It’s just a matter of placing the pierced eggplant onto the grill and roast until they are fully cooked inside (about 20-30 minutes). Remember to flip them so all sides get in contact with the flame. May I recommend that you try to get all the same size for each batch of grilling. I started with my large ones, then moved on to smaller ones … this way I know they cook time would be the same for each in the batch.

The container I used was determined by how much I needed for a meal in my home, so all I’ll need to do is thaw one container and everyone would be sorted at breakfast or dinner. They were found at a local wholesale grocery where restaurants shop (all restaurant supply shops will have them) and they were under $12 for 50 (tub and lid). If you don’t have a lot of space in your freezer you may use freezer zipper bags as they can lay on each other. Or you can rock your vacuum sealer.

Once fully cooked (the skin will be burnt and hard in some cases), it’s time to get started. My setup was as follows. I had a large bowl next to my large baking sheet and the smaller baking tray was used to transport the roasted eggplant to the table. I placed two roasted eggplant onto the large baking sheet, then using my pairing knife I cut them open (watch the video below) and scraped the cooked insides out with the spoons. That flesh was put into the large bowl to cool.

May I recommend that if you’re using a propane grill that you have an extra tank of gas. While I do have 3 tanks.. yup! I ran out of propane (they were all empty) and had to stop to go to the Costco to get them refilled. In doing so mid-roasting (having to stop), those eggplant which were 1/3 cooked, became dark and discolored on the inside when I finally got back to them.

As you work your way though the roasted eggplants, toss the skins into your rubbish container (you may compost). I worked my way through a batch, then I added more to the grill so I’d have time to rest between roasting and scraping.

Once cooled a bit I started to fill all of the containers with the appropriate amount. Please keep in mind that there’s liquid in eggplant and liquid expands when frozen. Leave a bit of space at the top to compensate for that expansion. Additionally, I knew I’d be adding roasted Scotch Bonnet Peppers at the top, so even more space was left in my case.

Refer to the image below. As you work your way through the roasting and scraping you may encounter a few with mature seeds and a bit of discoloration. My mom hates this in her Choka and with her as my teacher – I dislike too! So that area made it’s way into my rubbish pail. Not a big deal, but you can decide what you want to do if that’s the case.

One of the questions I received on Instagram was if I added salt or anything else into the containers. No What I do is thaw a container, crush the pepper along with salt and raw garlic in my mortar. I then add the thawed eggplant to the mortar and with my pestle I crush that too. Top with thinly sliced onions and temper (chunkay) with smoking hot oil. Stir! So no salt at this point and don’t worry about crushing the eggplant smooth now.

After I worked my way through all of the eggplant and had it all in containers I could then count the yield and know exactly how many peppers I’d need to roast. By roasting of charring (blister) the peppers, you get a wicked smokey flavor along with the heat.

Some of the containers were scheduled to be delivered to my parents in Toronto and knowing my dad does not tolerate spicy foods, those containers didn’t have any need for roasted peppers. Should you not be able to handle an entire scotch bonnet pepper, may I recommend you skip this step and add raw pepper when you make the actual Choka, in the amount you can handle. Or divide the roasted peppers accordingly in your containers. Wear gloves when cutting/handling the peppers. You may use any hot peppers you enjoy or can source.

NO I didn’t wash the eggplant as I only needed the insides, but the peppers were washed and air-dried before roasting. However if your eggplants comes with dirt on them, hose those suckers down!

Allow them to cool COMPLETELY before freezing! Save money and enjoy the convenience.

Caribbean Green Seasoning
Gluten Free Sauces & Condiments Vegetarian

Caribbean Green Seasoning.

Yes, I’ve shared a few Caribbean Green Seasoning videos on YouTube and Facebook, and while I have shared a version here on the website, that recipe dates back to 2009 and since then over 700 recipes have since buried it. Basically people are having a difficult time finding it. If you’re not familiar with Caribbean Green Season, it’s the go-to marinade for our poultry, meat, fish + seafood and vegan/vegetarian dishes.

You”ll Need…

750 ml Olive Oil
15-18 scallions
.226g (about 1/2 lb) garlic
3 cups chopped parsley
6 Pimento peppers (aka seasoning pepper)
2 Green Scotch Bonnet Peppers (see note below)
2 cups chopped Cilantro (coriander – see note below)
1 bundle Thyme (about 50-70 sprigs)
1 cup chopped celery (leaves)

5 Italian roaster Peppers

Note. Please watch the video below as I explain a few things concerning the ingredients of my (and potentially your) Caribbean Green Seasoning. Especially why I DO NOT recommend adding ginger, rosemary and basil. Further to what I mentioned, I find that since Basil is a delicate herb and, it’s better used fresh. If I had more seasoning peppers (Pimento) I’d use those instead and not the Italian Roaster Peppers (Cubanelle works too). Since I didn’t have time to drive to Toronto to get Chadon Beni (culantro) I opted for Cilantro. Usually my garden has Spanish Thyme (big leaf aka podina), sadly not this year. Should you do decide to use Rosemary and you have Spanish Thyme, do use sparingly as there are very pungent and can overwhelm your Green Seasoning. As explained in the video I use Olive or Grape Seed oil as my base as it helps to maintain the vibrant color and flavor of the finished green seasoning. Traditionally people use water or vinegar. Finally, you’ll notice I didn’t use any onion in my Green Seasoning, as I find that it diminishes the shelf-life of it (goes bad quickly).

Start by washing the ingredients really well, especially the cilantro which can have a bit of dirt still attached to the roots. In washing, remove dead leaves and other debris.

Allow them to air dry on a kitchen towel, then give everything a rough chop to make it easier for your blender or food processor. I much prefer using a food processor as I can get it to the perfect texture and consistency. I like it somewhat thick and with a bit of body as compared to most people who basically liquify it.

With the Thyme, you may use the tender stems, but PLEASE Remove the woody ones and discard. They may not break down in the food processor and become a choking hazard when you use the Green Seasoning later on in your meals.

Stack (in layers) some of each ingredient, add about 1/2 the oil and pulse with your food processor (yes, you can use a blender as well). Stop to scrape down the sides and to keep adding more of the herbs, garlic and peppers.

I like layering the ingredients as I find I get a much better combination at the end. I did mine in two batches as this lot will make a few containers of Caribbean Green Seasoning.

I then fill up containers (save the ones after use as the Green Seasoning smell and taste will taint them), BUT leave about a cm space to the lid. Then to the back of the fridge where they live for the next couple months… until it’s time to make another batch. They will keep for at lest 6 months in the fridge if you’re wondering. Additionally you can freeze the Green Seasoning in ice trays, pop them out, then into a freezer bag and store in the freezer. Every time you need some, pop a cube out, instead of having to thaw a full container.

Recipe Card

Difficulty: Intermediate Prep Time 10 mins Total Time 10 mins
Servings: 10

Description

A large-batch version of Caribbean green seasoning, ideal for meal prep and frequent cooking. This traditional blend of fresh herbs, peppers, and aromatics is a cornerstone of Caribbean cuisine, used to marinate meats, season stews, and elevate everyday dishes with bold, authentic flavor.

Ingredients

Instructions

Video
  1. Wash all herbs and peppers thoroughly and allow them to air-dry. Roughly chop the herbs, garlic, and peppers to prep for blending. Remove woody stems from thyme; use only tender stems and leaves.
  2. In a food processor or blender, add half of the chopped ingredients and half of the olive oil. Pulse until the mixture begins to blend.
  3. In a food processor or blender, add half of the chopped ingredients and half of the olive oil. Pulse until the mixture begins to blend.

  4. Gradually add the remaining ingredients and olive oil, blending until the desired consistency is achieved.

  5. Transfer the green seasoning to clean glass jars, leaving about 1 cm (½ inch) of space at the top.

Tell us what you think