/Seafood (Page 24)
Gluten Free Seafood

Jamaican Callaloo With Shrimp.

jamaican callaloo with shrimp (10)

As I’ve discussed in my Cookbook, there’s much debate in the Caribbean when it comes to callaloo. In the southern Caribbean it’s a delicious soup-like dish made with young dasheen bush leaves, flavored with crabs (for the most part) and simmered in coconut milk. However in Jamaica, callaloo is the bush or plant (amaranth) which is prepared in several different ways, but most popular is Jamaican Callaloo With Saltfish.

In this version of cooking Jamaican callaloo ((amaranth, chorai bhagi), we’ll bypass the salted fish and go with some precooked shrimp. However you can certainly use fresh shrimp for even more flavor.


You’ll Need…

2 lbs Jamaican Callaloo
1 tablespoon Coconut Oil (or olive)
1/4 teaspoon sea salt (your fav salt)
1/8 teaspoon black pepper
1/2 medium onion
3 cloves garlic
1/4 scotch bonnet pepper
1 cup small shrimp (pre cooked)
1/2 cup water
1 medium tomato diced
1 scallion
2 sprigs thyme

jamaican callaloo with shrimp (1)

Wash, trim and chop the callaloo into ribbons. If using some of the stem, do try to use the tender ones and try to scrape of some of the outer skin. Thinly slice the garlic, chop the onion, scallion and tomato and finely dice the scotch bonnet pepper.

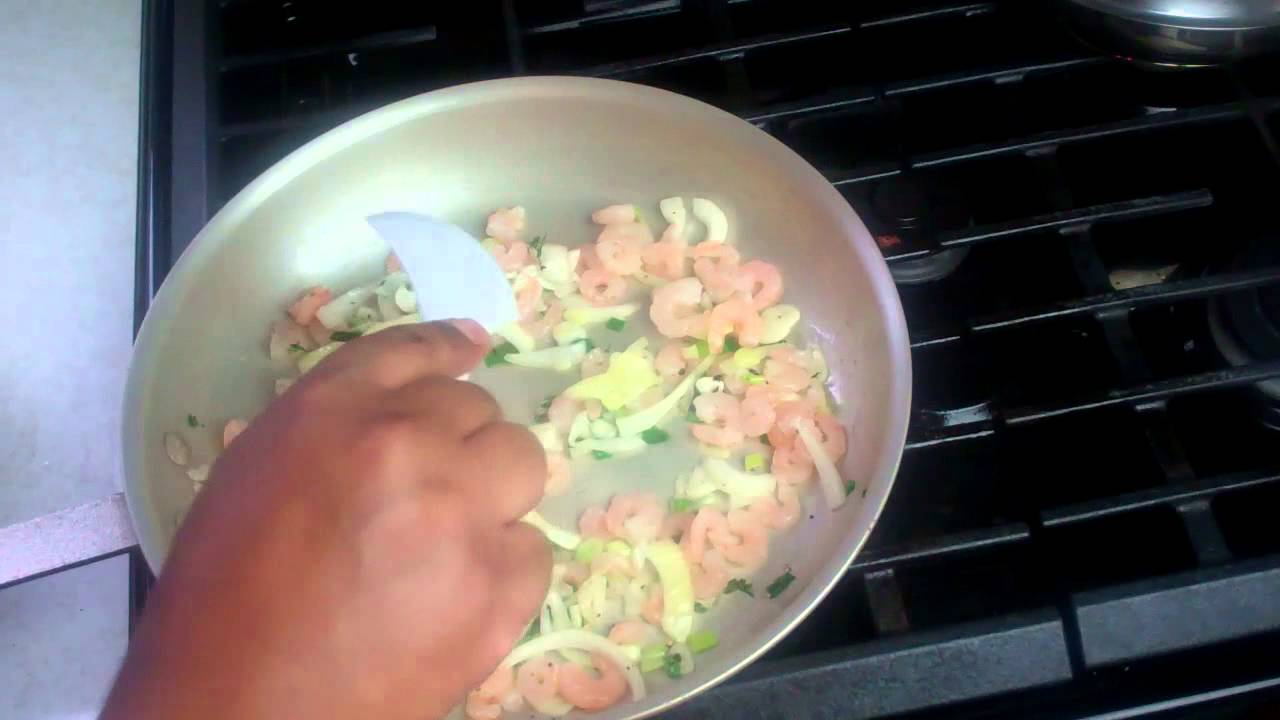
Heat the oil in a wide pan on a medium flame, then go in with the onion, garlic, black pepper and scallion. Drop the heat to low and let that go for about 3-4 minutes.

jamaican callaloo with shrimp (2)

It’s now time to add the shrimp (if using frozen-precooked shrimp, wash and squeeze to remove most of the water) , stir well and cook for another 3 minutes. Yes the shrimp is already precooked, so you can easily add them near the end, but I quite like adding them now to enhance the flavor of the dish. If using fresh shrimp, cook for about 3 minutes, then remove them from the pan and set aside. Add back the last 3-4 minutes of cooking.

jamaican callaloo with shrimp (3)

Turn the heat up to medium high and go in with all the other ingredients (not the water  or lemon juice yet) and stir well. It may seem at first that your pot is not large enough, but the callaloo will wilt down. After a couple minutes, add the water and cook until tender.

jamaican callaloo with shrimp (4)

jamaican callaloo with shrimp (8)

After about 10-12 minutes, taste for salt and adjust accordingly. Here is where you’ll personalize this dish by checking to see if you like the current texture of it. Some people like their Callaloo very tender, while other like a slight bit of texture to it. In my case it was close to where I like it, so I went in with the lemon juice and turned up the heat to burn off the remaining liquid in the pan.

jamaican callaloo with shrimp (9)

The lemon juice will help balance the flavors of this dish and quite honestly elevate it. This dish (please review all the ingredients) can be considered gluten free and if you want to add a bit more flavor you can use coconut milk as a replacement for the water. Not the classic Jamaican callaloo with Saltfish or Chorai bhagi with saltfish as we would call it in Trinidad and Tobago, but I assure you… you’ll love this take on cooking Jamaican callaloo.

Recipe Card

Difficulty: Beginner Prep Time 10 mins Cook Time 15 mins Total Time 25 mins

Description

Sautéed callaloo greens and shrimp in garlicky, aromatic herbs make this a comforting, flavorful Caribbean dish.

Ingredients

Instructions

Video
  1. Wash, trim, and chop the callaloo into ribbons. If using the stems, use only tender ones and scrape off some of the outer skin. Set aside.
  2. Thinly slice the garlic, and chop the onion, scallion, tomato, and Scotch bonnet pepper.
  3. Heat oil in a wide skillet over medium heat. Add onion, garlic, black pepper, and scallion. Reduce heat to low and sauté for 3–4 minutes.
  4. Stir in shrimp (if using precooked, rinse and squeeze out excess moisture). Cook for 3 minutes. For fresh shrimp, cook for 3 minutes, remove, and set aside; return them during the final few minutes of cooking.
  5. Increase heat to medium-high and add the callaloo, tomato, thyme, and Scotch bonnet. Stir to combine; the greens will wilt down.

  6. Add water and simmer uncovered for about 10–12 minutes or until callaloo reaches your desired tenderness.
  7. Taste and adjust salt as needed. Optional: Finish with a splash of lemon juice to balance the flavors. Stir to combine and cook off any excess liquid.
  8. Add reserved shrimp if using fresh. Stir in scallions. Serve hot.
Tell us what you think
Gluten Free Seafood

Taro With Stewed Saltfish Caribbean Comfort Food.

taro with stewed saltfish (12)

After seeing the price of dasheen at the market, I opted for the much cheaper taro as I had a craving for what we call ground provisions, in the Caribbean. Dasheen, yams, eddoes, sweet potato and cassava all fall under the ‘ground provisions’ umbrella – also known as ‘food’ in Jamaica. The taro is very similar to our beloved dasheen, the main difference being it’s white in color (when peeled) and a bit milder in taste.


You’ll Need…

2-3 lbs taro (dasheen)
1/4 teaspoon salt
water for boiling the taro
2 medium tomatoes
3 scallions
1/4 scotch bonnet pepper
2 cloves garlic
3 sprigs thyme
3-5 tablespoon olive oil
pinch black pepper
1 onion
1 cup shredded saltfish (salted cod)

To learn how to prepare the salted cod (any dry salted fish) watch this video (click): How To Prepare Saltfish.

taro with stewed saltfish (1)

Do wear gloves or coat your hands with some vegetable oil as the sap/starch from peeling the taro can cause some irritation to your hands/fingers. Using a sharp knife or potato peeler, remove the other skin off the taro (discard). Also remove any blemishes and cut off any previously cut areas (like the stem area) to expose the fresh interior. Cut into 2 to 3 inch pieces  and place in a pot covered with water on a high flame. As it comes to a boil add the salt , turn down to a rolling boil and cook until tender. Taro cooks faster than dasheen, so in about 10-15 minutes it will be fully cooked. Pierce with a sharp knife and if there’s no resistance you know it’s fully cooked.

taro with stewed saltfish (2)

taro with stewed saltfish (4)

taro with stewed saltfish (5)

Drain and set aside as we get to the next step of the recipe..stewing the saltfish!

Prepare the salted fish by boiling in water, drain, rinse with cool water and shred (watch the video mentioned above). Then slice the onion, garlic, scallions and scotch bonnet pepper. Remember you can use more or less scotch bonnet pepper and do wear gloves when handling them (wash your hands with soap and water immediately after).

Heat the olive oil on a medium flame (large sauce pan) and go in with the shredded salted fish. Let that cook for about 3 minutes (low heat) before adding the onion, garlic and black pepper. Cook for another 3 minutes, then add the thyme.

taro with stewed saltfish (6)

taro with stewed saltfish (7)

taro with stewed saltfish (8)

taro with stewed saltfish (9)

After 2 minutes add the tomato, scallions and cooked taro. Stir well and cook for another 3-5 minutes to infuse the taro pieces with the stewed salted fish.

taro with stewed saltfish (10)

taro with stewed saltfish (11)

We didn’t add any salt to the stewing of the salted cod as the residual salt from the curing process will be enough to season this dish. If you want you can also add some bell peppers for extra flavor and vibrancy (with the colours). Besides being very delicious, this dish can be considered gluten free as well.

Do serve warm.. btw this is a one-pot dish!

Recipe Card

Difficulty: Beginner Prep Time 15 mins Cook Time 30 mins Total Time 45 mins
Servings: 4

Description

Creamy taro paired with savory stewed saltfish, aromatics, and herbs for a comforting Caribbean-style one-pot meal.

Ingredients

Optional

Instructions

Video
  1. Using a sharp knife or potato peeler, remove the other skin of the Taro (2 pound) and discard. Remove any blemishes and cut off any previously cut areas to expose the fresh interior.
  2. Boil or steam taro chunks in salted water until fork-tender, about 15–20 minutes; drain and set aside.

  3. While taro cooks, heat oil in a large pot over medium heat. Sauté onion, bell pepper, celery, and garlic until softened, about 5 minutes.

  4. Add tomato, Scotch bonnet pepper, and thyme.

  5. Cook 3 minutes more until fragrant. 

  6. Stir in flaked saltfish and cook for 5 minutes to meld flavors.

  7. Gently fold in cooked taro chunks, stirring carefully to coat with the stewed mixture.

  8. Season with salt and pepper to taste, stir in scallions, and serve hot.

Tell us what you think
Seafood

Sweet Potato Crab Cakes Recipe.

If you’ve priced or purchased crab meat from the fish market or grocers you’d know how expensive the stuff can be, so making crab cakes can be a bit hard on your pocket. My love for crab cakes is deep, so I came up with this recipe for using canned crab meat which is very inexpensive. With the fresh herbs, the slight kick from the finely diced scotch bonnet pepper and sweet (and creamy) undertones of the sweet potato, you’ll be quite pleased by these budget friendly crab cakes.

You’ll Need…

1 can crab meat (120g)
pinch black pepper
1 tablespoon mayonaise
1 cup bread crumbs
1 lb sweet potato
1/4 teaspoon salt
1/4 teaspoon thyme
1 tablespoon chopped parsely
1 tablespoon chopped red onion
1/2 scotch bonnet pepper (diced finely) – no seeds
1 scallion diced
1 cup veg oil for frying

Notes: You can use 1 egg to bind everything if you find the batter is overly wet or soggy. Remember to drain and squeeze the crab to get rid of water and please don’t don’t use immitation crab nor expensive lump crab.

Peel and cut the sweet potatoes in half, then boil in salted water until tender. To know if they are fully cooked, pierce with a pairing knife and if there’s no resistance it means they’re cooked. Drain and mash in a deep bowl. As the mashed sweet potato cools, you can finely dice/chop the other ingredients.

sweet potato crab cakes (2)

sweet potato crab cakes (3)

sweet potato crab cakes (4)

sweet potato crab cakes (5)

sweet potato crab cakes (6)

It should be cool now, so go in with all the ingredients, except the crab meat and bread crumbs… mix well.

sweet potato crab cakes (7)

Fold in the crab meat, then chill in the fridge for about 20 minutes so everything firms up a bit. Now roll into balls (golf ball size), after-which you’ll need to roll the balls in the bread crumbs, pressing down gently so the crumbs hold on.

sweet potato crab cakes (8)

sweet potato crab cakes (9)

sweet potato crab cakes (10)

sweet potato crab cakes (11)

Heat the vegetable oil on medium (olive oil will give it a good flavor as well) in a wide pan, then press down on each crab cake ball to form a sort of patty.

sweet potato crab cakes (12)

All you have to do now is fry them on each side until golden brown, drain on paper towels and enjoy!

sweet potato crab cakes (13)

sweet potato crab cakes (14)

sweet potato crab cakes (15)

I would suggest that after forming the patties that you place them in the fridge to chill and firm up a bit so they hold their shape while frying. These sweet potato crab cakes goes well with the garlic sauce I shared a while back or you can opt for  a ranch dressing you’d normally get at the supermarket.

Seafood

Herb Crusted Basa Fillet Done The Caribbean Way.

Herb crusted what? I’ll be first to agree that during my childhood days in the Caribbean, you’d never come across such a recipe. But the new generation of chefs and home cooks are experimenting with great success. We had fish four ways growing up.. fried, curry, stew and in fish broth (pronounced broff). Mom was a traditionalist and her dishes reflected the mentoring she got from her mother and aunts before her.

Basa (Pangasius bocourt, similar to catfish) is one of the most inexpensive fish you can get in our city at the various Asian markets and the good part is .. they are fillets. So you don’t have to worry about bones especially if you want to get your children eating fish.


You’ll Need…

2 Basa Fillets

Herb crust…

2 slices of bread (white bread with crust removed)
1 tablespoon parsley
1 scallion
1/4 scotch bonnet pepper
pinch salt
1/2 teaspoon thyme (fresh)
dill optional
1 tablespoon melted butter
1/4 teaspoon lemon zest

dressing…

1  1/2 tablespoon mayo
1/4 teaspoon lemon zest
1 tablespoon lemon juice
pinch salt
pinch fresh ground black pepper

* You’ll also need about 1 tablespoon olive oil. Remember to wear gloves when handling scotch bonnet peppers (wash your hands with soap immediately after) and don’t use any of the seeds.

Remove the crust off the bread (and break into smaller pieces) , give the scotch bonnet, scallion and parsley a rough chop and remove the tiny leaves off the thyme stem. Add it all to a food processor and blitz until you have a crumbly consistency. Add in the salt, melted butter and grate in some lemon zest. Pulse a couple times and get ready to dress the fish.

Wash and pat the basa fillets dry with paper towels, then drizzle on some olive oil on a parchment lined baking tray and place the filets on it (no oil on the fish itself). The oil will add subtle flavor and prevent the fillets from sticking as it cooks in the oven. Add a bit more oil if using tin foil instead of parchment paper. Preheat your oven at 375 F.

As the oven comes to temperature lets give the fish some more flavor and help keep it moist when it’s done doing it’s thing in the oven. In a small bowl mix all the ingredients mentioned for the dressing, then lather it onto both pieces of fish.

I simply used the back of a spoon to paste this creamy sauce over the Basa fillets. Now it’s time to get crusty! Pour half of the herb crust we made over each fish and gently press down on it so it holds on the creamy dressing.

In the 375 F oven, middle rack for about 15-20 minutes.. depending on how thick your fillets are and how well done you like your fish.

Not you conventional Caribbean fish recipe, but I assure you it’ will be a ‘go-to’ recipe the very first time you give it a try. The herb crust will certainly stand out and the fish itself will be tender and moist from that lovely dressing we started off with.

Before you go, don’t forget to check out the latest cooking videos, connect with me on twitter and join our community on facebook. Oh yea! Leave me a comment below – it’s appreciated!

Gluten Free Seafood

Simple Oven Jerk Fish Recipe.

With Easter around the corner I’ve had several requests for fish recipes, so I thought I’d share a simple technique for making Jamaican style jerk snapper (fish), but with store bought jerk marinade and in your oven. I agree that making your own jerk marinade is much better and using a grill with coals and pimento wood is what true Jamaican jerk is all about. However this is all about convenience and exciting flavors.


You’ll Need…

2-4 lbs Red Snapper
1/2 lime or lemon (for washing the fish)
1 heaping tablespoon of jerk marinade (use gluten free for the gluten free version)
1 tablespoon orange juice
pinch salt and black pepper
1 tablespoon veg oil

* Use your favorite store purchased jerk marinade.

Scale, trim (gut) and wash the fish with the juice of 1/2 lime or lemon.. rinse with cool water and pat dry. Cut two slits on the back (both sides) of each fish to allow for the jerk marinade to penetrate and do all-kinda good things. Stuff the cavity of each fish with a bit of thyme and scallions (bruise or crush with your knife to release the flavors) and sprinkle a bit of salt and black pepper.

In a small bowl mix the jerk marinade (use your fav) and orange juice, then brush it onto both sides of each fish. Try to get some in the cuts we made. Cover with plastic wrap and allow to marinate in the fridge for about 1/2 hour (max 1 hr as the marinade will start to cook the fish after that).

Now preheat your oven to 400 F and line a baking tray with parchment paper. Drizzle on the veg oil so the fish won’t stick as it does it’s thing in the oven. Set the baking tray on the middle rack in your oven and let it go for about 15 minutes. Then flip over and cook for another 8-10 minutes. This depends on how thick your fish are and how well done you like your fish.

There you go, a simple but exciting jerk fish done in your oven.. no need for an outdoor grill. Remember if you’re serving this to kids be mindful of the bones of the fish. If you decide to use fish fillets, try to get some with the skin still on and reduce the cooking time (again, depending on the thickness of the fillets) by about 1/2.

Before you go, don’t forget to check out the latest cooking videos, connect with me on twitter and join our community on facebook. Oh yea! Leave me a comment below – it’s appreciated! Important, do read the label of the jerk marinade you use to ensure it meets with your gluten free dietary needs.

Gluten Free Seafood

Coconut Curry Mussels Done The Caribbean Way.

Very much like the ‘Curry Lobster” recipe I shared a while back, Mussels is not something you’ll find normally being prepared in the Caribbean, unless it’s at one of the many high end restaurants we have catering to a mainly tourist clientele. This curry mussels recipe is basically my take on a shellfish which is readily available in Canada.. where we presently call home. I’m sure you’ve heard of PEI mussels!


You’ll Need

2 lbs mussels
1 cup coconut milk
2 tablespoon curry powder (use gluten free)
3 cloves garlic (minced)
1 Shallot (minced)
1/2 teaspoon salt
fresh ground black pepper
1 large tomato diced
3 tablespoon chopped cilantro
1 scallion
1 cup beer – optional
1/4 scotch bonnet pepper
2 tablespoon olive oil

Note: I like using a good Caribbean lager beer… like Carib! But you can use any beer you enjoy. I used my fav madras curry blend out of the Caribbean, but you can certainly use whichever curry you enjoy. If doing this recipe gluten free, do ensure that the curry powder has no flour filler to meet with your specific gluten free dietary needs.

Mussel Tip! Their shells should be tightly closed when you buy them, or they should close when you tap them. They will open their shells to try and cool themselves off as they cook, so no open shells at the end of cooking means they were dead to start, and probably not safe to eat.

See the tip above for selecting your mussels. Wash under cool water, remove any debris or strings attached to the mussels and get ready to cook. Dice the tomato, scallion, garlic and shallot. Remember to wear gloves when handling the scotch bonnet peppers, wash your hands immediately after with soap and water and don’t include any of the seeds of the pepper.

In a wide saucepan heat the oil on a medium flame, then add the shallot and garlic. As we’ve done in other curry recipes, turn the heat down to low to help gently cook the garlic and shallot for that exciting base of flavor.

After about 3-4 minutes, go in with the curry powder (low heat still) and cook for another 3 minutes. This will toast the curry to really bring out the flavors of the spices which make up the curry blend. Then add the diced scallion, turn up the heat to high and go in with the mussels.

Top with the finely diced scotch bonnet pepper, coconut milk, salt, tomato, black pepper and beer (stir well). Bring to a quick boil and cook for about 4-5 minutes (until the mussels open).

I like to finish this off with a squeeze of fresh lemon juice (not mentioned in the ingredient list as it’s a personal choice) and top with the chopped cilantro. The sauce will be thin compared to other curry dishes we’ve prepared before, so don’t think it’s soupy and a mistake. Get some good bread and tuck in for real flavor.

The sauce will be thin compared to other curry dishes we’ve prepared before, so don’t think it’s soupy and a mistake. Get some good bread and tuck in for real flavor.

Before you go, don’t forget to check out the latest cooking videos, connect with me on twitter and join our community on facebook. Oh yea! Leave me a comment below – it’s appreciated.