While I’ve been the recipient of many airfryers (brands send them to me), I sparingly use them. Why? I cook for 5 people and the size of the standard airfryer is not as accommodating, unless you cook in batches. However the new stove I purchased a few months back (DON’T BUY Samsung stoves) has an airfryer feature (essentially a wire basket, with the convection setting on) which allows for cooking larger amounts.
You’ll Need…
1 lemon (juice) 3 pounds chicken wings (trimmed) 1/2 teaspoon sea salt 1 1/2 tablespoon Bone Sucking Sauce (powder)
Notes. In my culture we wash our meats, but if that’s not your thing you can skip that step. To keep things simple I used a prepacked rub. You may make your own or use a brand you like. I am not affiliated with the brand I used.
Trim and wash the chicken wings with cool water and the lemon or lime juice. Then pat the chicken wings dry with paper towels and season with the salt and the Bone Sucking rub on both sides.
I set my airfryer to 380 F and gave the wire rack a coat of baking spray (oil) to prevent sticking and to assist clean-up after. Try to leave some space between each wing, so there’s airflow – better even cooking.
Just before I placed the seasoned chicken wings in the airfryer I gave the top of the wings a quick spay of the baking spray (optional).
After 20 minutes, I flipped the wings to the other side and put them back into the airfryer, but at 400 F.
Depending on how big the chicken wings are that you used, it will take another 10-15 minutes. You’re looking for a golden colour with a bit of charring on the edges.
Now you’re probably wondering why I mentioned to not get a Samsung Stove. The list of reasons is long, but in keeping with the airfryer feature – the entire oven gets to be a MESS. The grease splatter is not only throughout the oven, it’s caked on at the bottom of the oven and door. A $3000 + stove/oven that’s stained only after the first use. Stupes! Let me know if you’re interested in a full review video on the Samsung Dual Oven With Airfryer in the comments below.
I know this is not your typical Caribbean recipe, but with all the requests I’ve been getting for Slow Cooker and Airfryer recipes, I thought I’d share. Plus.. who doesn’t like a good crispy yet juicy Chicken Wing?
Do we really need another Curry Goat recipe? If the technique is different than the ones I’ve already shared, absolutely YES we do! Over the years we done Curry Goat in theOven, in the Slow Cooker, Coal Pot,Pressure Cooker, and the more traditional low and slow way. However, in none of those recipes did we employ the use of this technique of cooking curry.
You’ll Need…
4-5 lbs goat (with bones) 1 lime or lemon (see note) 1 medium onion (sliced) 10-14 cloves gallic (smashed) 2 1/2 tablespoon olive oil (use your fav oil) 2 heaping tablespoon Caribbean Green Seasoning 2 bay leaves | 1/2 teaspoon black pepper 3/4 tablespoon Anchar Masala 1 teaspoon Cumin seeds (geera) 1 scotch bonnet pepper (see note) 2 1/2 tablespoon curry powder 4-6 pimento berries (allspice) 1 large tomato (diced) 3/4 tablespoon salt (adjust) water 6 sprigs fresh thyme 2 tablespoon chopped parsley
Notes! May I suggest that you watch the video below as I share valuable washing, cutting, and other important steps in more detail. I used goat meat with bones as I much prefer the deeper flavor I get from doing so. If doing this recipe gluten free, please go through the full list of ingredients to make sure they meet with your specific gluten free requirements. Especially the Curry Powder you use as some may contain fillers. The Anchar Masala can be sourced at your local or online West Indian grocers. In total I used close to two Scotch Bonnet peppers as I enjoy my Curry Goat spicy. You’re free to use as much or less to your own heat tolerance.
In a deep heavy pot on a medium flame, add the oil, followed by the onion and garlic. Cook on low for 2 minutes, then add the cumin seeds, black pepper, 1/2 a scotch bonnet pepper and Caribbean Green Seasoning. Cook for another 3 minutes on low, stirring a few times.
Add the curry powder and stir well. Cook for 4-5 minutes. Now turn the heat up to medium and add 1 1/2 cups water. Followed by the pimento berries, tomato, and Anchar Masala. Should you not have the masala, use 1 teaspoon ground roasted cumin (geera).
The goal here is to cook out the ‘rawness’ of the curry, while building a wicked curry base. Add the bay leaves. The tomato will help us later develop a wonderful gravy and the acidity brings balance to the overall flavor of the curry.
Cook on a rapid boil until all of the liquid is gone. This step will concentrate the overall flavor of the curry. In the video I explained that I want to see the oil we started with, plus get separation when I pass my spatula.
At this point we’ll add the washed and drained goat to the pot. Turn the heat up to medium/high as we want to sear the pieces of goat and in the process coat it with the curry. No we did not season the goat in advance and in the video I explained how and why I washed the the goat with the lime juice.
Turn the heat to medium, cover the pot and let the goat spring it’s own juices as it comes to a boil. After which, turn the heat to med/low and let it cook with the lid slightly ajar for 10 minutes.
Time to move on. Remove the lid, turn up the heat and burn off that liquid.
We now have to add liquid to slowly braise the goat until fork tender. I’ve been asked about using chicken and/or beef stock instead of the water I prefer using. Note that should you use stock, it will alter the taste of the finished curry. If I were to use any stock, it’d go for a vegetable one.
Add boiling water to the pot to cover the goat by about 1 inch or so. Bring to a boil, then turn the heat down to a simmer, add the salt and allow it to cook with the lid on (slightly ajar) for 2- 3 hours. Yes it will take long and as explained in the video, the cook time (getting tender) will depend on how old the goat was when it was butchered. An older goat will obviously take longer to tenderize.
As it came up to a boil I added the sprigs of time and floated a Fatali pepper (optional), which I broke later on to release the heat. Should you want to control the heat of this curry goat, do not add a scotch bonnet at the start when we did. Instead, float a WHOLE pepper at this point and Do NOT break it. Near the end, remove the pepper and discard. You’ll get a subtle kiss of heat and tons of flavor from the oils on the skin of the pepper.
Remember to stir every 20 minutes or so and make sure there’s water so it doesn’t burn (add if necessary). After about 2 and 1/2 hours, check to see if it’s tender to your liking and you may as well taste and adjust the salt now.
Once you’re happy with the salt and tenderness, adjust the gravy (turn up the heat to thicken.. but keep in mind that it will thicken as it cools). Final step is to add the parsley and turn off the stove. Since goat can be fatty (unless you use lean boneless), I find that the parsley cuts the fat a bit. Traditionally you’d use Shado Beni(culantro) or cilantro (coriander) instead.
We didn’t season and marinate the goat over night, however you’ll be pleasantly surprised how delicious this Curry Goat is.
Low and slow is the game. Yes a pressure cooker will cut the time by about 75%, but I can guarantee you, it will not be as tasty.
I originally shared a Curry Stew(ed) Chicken recipe back in 2009 and like the Caribbean Green Seasoning recipe I updated a couple days back, it’s now buried under hundreds of newer recipes. So while it’s not my intention to repeat recipes, you’ll find some subtle differences with this one, plus I had several requests for a ‘new’ version after I teased a video clip on Instagram.
You’ll Need…
3 lbs chicken wings (trimmed) 2 tablespoon curry powder 1 medium tomato (diced) 1 medium onion (diced) 1 tablespoon grated ginger 2 tablespoon Caribbean Green Seasoning 3/4 teaspoon salt (adjust) | 1/2 teaspoon black pepper 1 teaspoon tomato ketchup 1 Scotch Bonnet pepper (see note below) 1 1/2 tablespoon Grapeseed oil (see note) 1 1/2 tablespoon golden brown sugar 2 scallions (chopped) 1 tablespoon chopped celery leaves 2-3 cups water
Notes! I used an entire Scotch Bonnet pepper in the recipe as I enjoy spicy food. You have the option to use less or none at all. Additionally you may remove the seeds and white membrane from the pepper to cut back a bit of the heat. Yes, you can use any spicy pepper you enjoy or have access to. I opted for grapeseed oil since I was out of olive oil, however you may use any oil you like. Do note that we’ll start the dish on a high heat, so the smoke point of the oil you use may be a factor. If doing this recipe gluten free, please go through the full list of ingredients to make sure they meet with your specific gluten free dietary requirements. Especially the curry powder you use as some may contain fillers.
For best results, may I recommend seasoning the chicken wings (yes you may use other cuts of chicken with similar results) and marinate for at least 2 hours in the fridge.
Cut the wings into drumettes, flats and tips. You may keep the tips for making chicken stock.. I don’t. I’m from the Caribbean where we wash our meats, but that’s up to you (water and lemon, vinegar or lime juice) as I know we’ve been warned not to wash chicken. With clean, trimmed and drained wings in a large bowl, add the salt, tomato, curry powder (this is the curry element), black pepper, grated ginger, ketchup, onion, Caribbean Green Seasoning and Scotch Bonnet Pepper. Give it a good mix and into the fridge to marinate. Should you be pressed for time, you can start the “stew” process immediately.
I’ve included 2 videos below where you may find this ‘stew’ step better explained. In a heavy pot on a med/high heat, add the oil followed by the brown sugar. The sugar will melt, go frothy, then a deep amber in color. This is when you’ll carefully start adding the seasoned chicken wings to the pot and stir well. Should the sugar go black STOP, allow the pot to COMPLETELY cool , wash, dry and start back with new oil and sugar. Should it go black and you continue the finished dish will be very bitter tasting.
Turn the heat to medium/low, cover the pot and let it cook for 5-7 minutes. Natural juices will sprout up. At this point, remove the lid, crank up the heat and burn off that liquid. Add 2 cups of water to the same bowl you marinated the wings in and swish around to pick up any remnants of the seasonings. Once you can start seeing the oil we stared off with at the bottom of the pot, add the water and bring to a boil.
Once it comes to a boil, place the lid on slightly ajar and reduce to a rolling boil.
Should the water level be low and the chicken not fully cooked, add the additional cup of water to the pot. Twenty minutes later and your curry stew chicken wings will be fully cooked. It’s now time to personalize things. Taste and adjust the salt and decide if the gravy is thick enough to your liking. In my case I cooked it for a further 4 minutes to thicken up. But do keep in mind that the residual heat from the pot will thicken it further. So too when it cools.
Top with the scallions and celery leaves (use parsley if you don’t have the celery leaves) and turn off the stove.
Curry Stew Chicken Wings done! To recap and clarify as I know there are different versions of this curry-stew technique online and while I cannot find fault in the way people do their version, I must say that what I shared above is the original way in cooking curry stew. Basically you SEASON with the curry (powder) and STEW (caramelized sugar) to finish.
This is without any doubt, my fav way of enjoying wings – yes Buffalo Wings I said it. On it’s own or as a side to your fav carb.
Important! (save the hate)… I posted this recipe within the “Vegetarian” category as well. As explained in the video below, you may leave out the stewed chicken should you prefer for a fully vegan/vegetarian dish. With an abundance of Chorai Bhagi (aka, Jamaican Callaloo or Spinach) in my garden this year, naturally I could could not allow any to go to waste.
You’ll Need…
2 lbs Chorai Bhagi (prepared) 1 medium onion (sliced) 7 cloves garlic (smashed) 1/2 teaspoon black pepper 1/2 teaspoon salt 2 tablespoon olive oil 1/2 scotch bonnet pepper (optional) 2 tablespoon pure coconut cream Leftover Stewed Chicken (Caribbean style)
Important! If doing this recipe gluten free, please go through the full list of ingredients to make sure they meet with your specific gluten free dietary needs. I used scotch bonnet pepper in the recipe, but you can leave it out should SPICY not be your thing. Additionally, you can use any spicy pepper you like or can access. Should you wish to add some diced tomato to the dish, it will add a lovely subtle flavor to things.
Wash and trim the leaves off the stems (I didn’t use any stems this time, but you can), then roll the Chorai into bundles you can handle and cut into ribbons 1 centimeter thick.
Heat the oil in a deep pot on a medium flame, then add the prepared Choria Bhagi to the pot and stir well.
Add the salt, black pepper, garlic and onion. Stir well!
It’s now time to add the coconut cream and scotch bonnet pepper should you decide to have the dish with a kick. Yes I kept the seeds.. trim off the seeds and white membrane around the seeds to control some of the heat (discard).
Remember to wash your hands with soap and water after handling such HOT pepper.
Place the lid on the pot and cook for 10 minutes. It will wilt and lessen in amounts.
Add the leftover Stewed Chicken, stir well and place the lid back on for another 5 minutes.
Here’s when you personalize things to your liking. Taste and adjust the salt and you need to decide if it’s as ‘cooked’ as you like. In my case I removed the lid and cooked it for a further 3 minutes to burn off the liquid at the bottom of the pot.
Luckily I had some Sada Roti in the fridge my mom sent us home with the last time we visited, but it’s also EXCELLENT with Rice or dumplings.
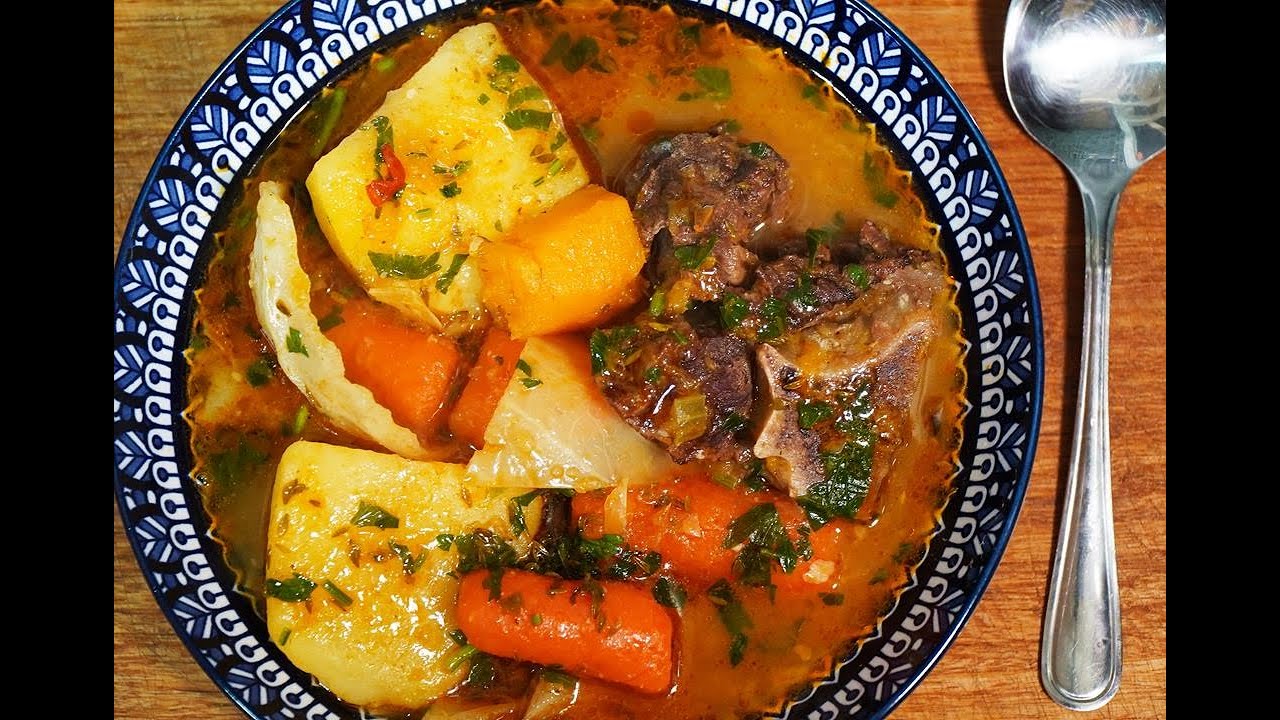
Over the years I’ve shared about 30 + Soup Recipes and to be honest and frank, I’ve barely touched the surface when it comes to Caribbean and Caribbean inspired soup recipes. Such is our love for soups throughout the Caribbean. While this one is not your typical thick and ‘stew’ like variety you’d normally enjoy on the Islands, it is packed with deep Caribbean flavors.
You’ll Need…
3 lbs beef neck bones 3 tablespoon olive oil 2 large head garlic 1 large onion (diced) 2 stalks celery (chopped) 1 teaspoon black pepper (divided) 1 1/2 tablespoon concentrate tomato paste 1 tablespoon salt 8 sprigs thyme 2 thick slices ginger 1 scotch bonnet pepper 10-14 cups hot water 3 medium carrots (cut large) 5 medium potatoes (cut in half) 1 1/2 lbs pumpkin (large pieces) 1 small cabbage (cut in large pieces) 2 tablespoon chopped parsley
Notes. Be sure to get your butcher to cut the bones for you, as you will not be successful with your clever or large chef’s knife. Any beef bones will work, in my case the neck bones I used had a fair bit of meat on it. If you’re doing this recipe gluten free, please go through the full list of ingredients to make sure they meet with your specific gluten free dietary needs.
Preheat your oven to 375 F. Wash the pieces of neck bones to remove any grit it may have from being cut on the band saw. Pat dry, then place in your roasting pan along with the garlic (skin on – I cut each head in half). Drizzle on the olive oil to coat everything.
Place a sheet of foil over the pan lightly and roast for one hour in the oven.
Remove the fat from the bottom of the roasting pan and place in your large soup pot on a medium/low flame. Add the onion, celery, 1/2 the black pepper, garlic we roasted (once cool, they will fall off the skin) and cook for 3 minutes. Then add the tomato paste and cook for another 2 minutes.
Add the roasted beef bones and stir well to coat. Then add the ginger, thyme (I tied them with string so later on they will be easier to remove) and float in the Scotch Bonnet pepper – DO NOT Break! Explained in the video.
Top with the water, turn up the heat to medium/high and bring to boil. Reduce to a gentle rolling boil. At any time you may watch the video below should you have any relating questions.
As it comes to a boil, add the carrots. Cook for 1 hours and 40 minutes. Then remove the ginger pieces, the thyme and at this point you will decide if you want to remove the Scotch Bonnet or break it to release the beast (heat). They’ve all done their respective jobs.
Add the pumpkin pieces along with the cabbage.
Bring the soup back up to a boil and cook for another 30 minutes or until the potato is tender. Please try to NOT over-stir as we don’t want to crush the carrot, pumpkin nor potato. The goal is to have a tasty broth with chunky pieces of vegetables.
At this point there may be pieces of bones where the meat fell off, you may remove those bones and discard. Taste and adjust the salt to you liking. The final step is to add the remaining black pepper and parsley. Turn off the stove.
TIP! You may add pieces of boneless pieces of beef (about 1 to 2 inches thick) to the soup at the start if you wanted (do not roast). And should you want an even more pronounced Caribbean flavor, add a tablespoon of homemade Caribbean Green Seasoning to the pot when you add the potatoes.
This hearty Caribbean beef bone soup combines roasted beef neck bones with a variety of root vegetables and traditional spices for a soul-warming dish that’s perfect for sharing.
Ingredients
Instructions
Video
Preheat your oven to 375°F (190°C).
Wash the beef neck bones to remove any debris. Pat dry and place in a roasting pan along with the halved garlic heads. Drizzle with olive oil to coat.
Cover the pan lightly with foil and roast in the preheated oven for 1 hour.
In a large soup pot, add the fat from the roasting pan and heat over medium-low flame. Add diced onion, chopped celery, half the black pepper, and the roasted garlic (skins removed). Cook for 3 minutes.
Stir in the tomato paste and cook for another 2 minutes.
Add the roasted beef bones to the pot, stirring to coat. Add ginger slices, tied thyme sprigs, and the whole Scotch Bonnet Pepper (do not break).Add the roasted beef bones to the pot, stirring to coat. Add ginger slices, tied thyme sprigs, and the whole Scotch Bonnet Pepper (do not break).
Pour in 10–14 cups of hot water, ensuring all ingredients are submerged. Increase heat to medium-high and bring to a boil.
Once boiling, reduce to a gentle rolling boil. Add the carrots and cook for 1 hour and 40 minutes.
Remove ginger slices, thyme sprigs, and Scotch Bonnet Pepper (or leave for added heat). Add potatoes, pumpkin, and cabbage to the pot.
Bring the soup back to a boil and cook for an additional 30 minutes, or until the potatoes are tender. Avoid over-stirring to maintain vegetable integrity.
Remove any bones that have separated from the meat. Adjust salt to taste. Stir in remaining black pepper and chopped parsley.
Ladle the soup into bowls, ensuring each serving has a mix of meat and vegetables. Enjoy hot.
There are many variations of making/cooking cornedbeef (from a can) in the Caribbean, making it easy to not know them all. Each family will have their version and while it may not be YOUR version, there’s no need to cornedbeef shame anyone (smile). There were mixed reactions from fans after I posted the video tutorial on YouTube(same video below)… mainly because they reacted to the title without watching the video where I explained why the use of Iceberg Lettuce and not the traditional cabbage.
You’ll Need…
1 can (tin) cornedbeef 1 medium onion (sliced) 1 medium tomato (sliced/diced) 1 teaspoon tomato ketchup 1 habanero pepper (optional) 1/2 teaspoon black pepper 2 scallions (chopped) 1/2 medium iceberg lettuce (rough chopped)
Note! I didn’t start with any oil/fat in the pan to begin with nor did I add any salt to the recipe. I explain why in the video below. Should you not like spicy or prefer a different type of hot pepper, feel free to make adjustments. Optionally you may add thinly sliced or grated carrots, bell peppers and even frozen corn can make it’s way in here.
Place a saucepan (I used a non-stick) on a medium low heat and add the tin (can) of corned beef, then using a spoon or spatula, break it up into small pieces. I explain why in the video below.
Add the onion, tomato, ketchup, hot pepper of your choice (I used a habanero) and the black pepper. Give it a good mix to combine. Cook for 4-6 minutes on a medium low heat.
Toss in the scallions, stir and cook a further 2 minutes before adding the roughly chopped lettuce to the pot.
At this point my mom usually turns the stove off (after mixing in the lettuce) and allow the residual heat from the pot to finish things off. In my case I left the stove on for a further 2 minutes before turning it off.
Other options (besides cabbage and lettuce) are kale, spinach and/or Jamaican callaloo (chorai bhagi). The perfect topping for hot steamy rice or if you have the time, rock some hot Sada Roti. When all fails, there’s nothing wrong with everyday sliced bread as a side or for a sandwich.