While I’ve had souse (protein and vegetable pickle with a cold spicy broth) made from the less glamorous parts of the pig (ears, snout and trotters) and the odd time I’ve done it using chicken feet, this is my new favorite way to make this Classic Caribbean Pickle. Our culinary culture in the Caribbean is one where the entire animal is used.. and with very TASTY results. Supposedly this is a great ‘cure’ for hangovers!
Important! Wear gloves when handling such hot peppers and do wash your hands with soap and water immediately after. By keeping the seeds of the pepper it will enhance the overall heat of the dish. Discard the seeds and white membrane surrounding the seeds if you wish to cut back on the heat.
Note: The Octopus I used was a gift from a friend and it was already fully cooked (boiled it would seem).
Thinly slice the Octopus, pepper, cucumber (leave the skin on if you wish) and the scallions. Place in a bowl big enough so you can easily toss everything.
Basically all you have to do now is add the salt, black pepper, garlic, lime juice (a combination of 1 lime and 1 lemon works great as well), water and Shado Beni(or cilantro) and give it a good mix.
I’d recommend chilling this Octopus Souse before serving and after it’s been marinating for an hour or so, you may need to adjust the salt to your liking. It keeps in the fridge (in a sealed plastic container for at least 2-3 days). Conch, Oysters and Spiny Lobster can be used in the same manner with excellent results.
After one taste of this mango chow I knew it would be something I’d be addicted to and making very often. On our last trip to the islands, my friend David introduced me to this version of the spicy mango pickle I grew up eating as a young fella on the islands. However, the Chinese preserved prunes (sweet and salted) gave it a unique color and to be completely honest.. a flavor unlike any “chow” I’ve had before. Luckily, my ‘foodie’ senses kicked in and I went though the recipe in my head… well my version.
Here’s my take on a recipe where the original I cannot own, but I did ask David and the Salisha (the person who made it for David) if they would mind if I gave it a crack… and share it with you all.
You”ll Need…
3 large green mangoes 3/4 teaspoon salt 3 jalapeno peppers 2 scotch bonnet peppers 8-10 bird pepper (bird’s eye) 4-6 cloves garlic 6 shado beni leaves (or 1/2 cup cilantro) 2 large limes (juice) 1 cup water 1 pack of Salted Prunes (check Chinese supermarkets)
Mango Chow being assembled
Wash and peel the mangoes with a sharp pairing knife or potato peeler, then slice into stick-like pieces as in the pictures you see here on in the video below. Place the mangoes in a large bowl for mixing
Add the crushed garlic, salt, sliced Jalapenos and bird’s eye peppers, but first give then tiny cuts to release some of the flavor and heat of them.
Mango Chow with added chopped Shado Beni
Add the thinly sliced Shado Beni (Culantro) and remember you can also use chopped cilantro if you wish. I’d recommend wearing gloves and do wash your hands immediately after handling Scotch Bonnet peppers or any hot peppers as a matter o fact.
Preserved Sweet / Salted Prunes added!
Top with the salted prunes and add any missing ingredients to the mix. Give it a good stir to really combine all the flavors.
A Close look at the Chinese Sweet Salted Prunes.The Mango Chow all assembled.A closer look at the spicy goodness of Mango Chow.
I’d make two important recommendations at this point. 1. Store in a glass container in the fridge (up to 2 weeks). 2. Try to have it marinate for a couple hours before you dig in.
Do keep in mind that as it marinates it will change in color and will adopt some of the salty elements of the Salted Prunes. Be sure to shake it often and feel free to add more sliced green mangoes as you work your way though them. It will be fiery!
This island boy luv me some dhal.. that rich thick soup packed with tropical flavors, but made with very simple and cheap ingredients. Great on it’s own (cup of dhal) or as a side to rice and curry dishes. Dhal is very comforting and so simple to make. Here’s my take on this iconic dish with added spinach and kale, instead of the traditional use of “poi bhagi’ aka Malabar Spinach. Basically I’m using ingredients which are readily available to me here in Canada.
You’ll Need…
4 cups yellow split peas
1 tablespoon turmeric
12-14 cups water
3/4 tablespoon salt (adjust)
1/2 medium onion (diced)
8-10 cloves garlic (divided)
1/2 scotch bonnet pepper
1/2 teaspoon black pepper
2-3 cups baby spinach
2-3 cups baby kale
2 tablespoon olive oil
1/2 teaspoon cumin seeds
Important! Please go though the full list of ingredients to make sure they meet with your #Vegan #GlutenFree and/or Vegetarian dietary requirements. If you find that it gets too thick, feel free to add a bit more water. No, don’t use stock as it will ruin (IMHO) the flavor.
Bring the water to a boil in a LARGE pot. As this happens, it would be a great time to wash the split peas (watch the video below). Basically all you’re doing is rinsing the peas in cool water, while using your hands/fingers to massage the grains. This will create cloudy water.. drain and repeat until this water runs clear.
As the water comes to a full boil, add the washed split peas and turmeric and bring back up to a boil. Then skim off any frothy stuff at the top and discard. After-which you can add the onion, 1/2 the garlic, black pepper, salt and scotch bonnet pepper. (use as much spicy pepper as you can handle and remember to wash your hands with soap and water immediately after)
Reduce to a simmer and let that cook for about an hour and twenty minutes or until the peas are tender and start falling apart. It’s now time to make sure the dhal is smooth. I used a wooden swizzle stick to achieve this. Feel free to use a wire whisk or electric immersion blender. If using the blender may I suggest that you “pulse” as if it goes continuous it will add too much air to the dhal and it will take on a frothy texture.
Now ad the washed (and drained) baby kale and spinach to the pot and stir well. The residual heat in the pot will be enough to fully cook the greens. Take the pot of the stove and set aside.
In a small frying pan, heat the olive oil (high heat) then go in with the remaining garlic and the cumin seeds. Cook until almost burnt.. then pour over the dhal (this is called “chunkay). This step will add a lovely layer of further flavor. You MUST do this or your dhal will be lame. Stir well to incorporate everything.
Taste for salt and adjust… ENJOY!
I forgot to mention, this is a HUGE pot of Dhal, so I usually freeze the rest for use later in the week when I need my next hit of Split Peas Dhal. If you do freeze, reheat on a very low heat on the stove top.. add a bit of water to the pot.
There’s a special place in my belly for jerk pork (no lie). While I much prefer it made over a coals fire so you get lovely smoked sort of finish, which really compliments the herbs and other ingredients in the classic Jamaican jerk marinade. The said… reality in Canada is it can get VERY cold during the winter months, so realistically I had to come up with a recipe with will duplicate those same flavors, but in an everyday kitchen oven. Here is such a recipe.
For dressing the roasting pan (optional)
+ thyme 5-8 sprigs
+ scallions 3
+ Orange juice 1 cup
Important!If doing this recipe gluten free, please go through the entire list of ingredients to make sure they meet with your specific gluten free dietary needs. Especially the soy sauce, which will have to be substituted for a gluten free type like Tamari.
Basically all you’re doing to start, is to create the marinade. Give all the ingredients a rough chop (where needed), then into a food processor or blender. You have 2 options A smooth marinade or a somewhat chunky one. I prefer chunky, so I pulsed the ingredients until it was at the texture and consistency I like.
The next step is to (well what I did). The piece of pork I used was from the leg or shoulder area (round piece of meat), so I butterfly it and made some deep cuts at the same time, to allow the marinade to really penetrate the meat and infuse this wonderful jerk favor from deep (watch the video below). Please try your best to use a fatty or marbled piece of pork. Not only will it be a cheaper cut, that fat will render and keep the meat really moist. Place the pork in a strong (big) zipper bag and pour the marinade over it.. massage and place in the fridge overnight for maximum flavor. Place the bag on a plate in case the bag leaks and if you remember, try to flip it a couple times during the marination process.
The next day.. pre-heat your oven to 375F and allow your pork to come up to room temperature (outside the fridge). Then place it in a heavy roasting pan and add the other ingredients mention in the list above. I pour the orange juice in the same bag we marinated the pork and moved it around to pick up any remaining marinade. Then onto the piece of pork in the roasting pan (I used a shallow side dutch oven).
Now into the 375 F oven on the middle rack. No I didn’t cover the roasting pan. After 30 minutes of so, I took it out of the oven and used the juices on the side to baste it a bit, then back into the oven. I believe I did this about 5-7 times during the roasting process.
It took about 3 hours in total to fully cook to my liking. At that point I took it out of the oven, tented it with some foil and allowed it to rest for about 15 minutes before slicing it up. Keep in mind that if you use a piece of pork with a bone running though the middle like I did.. be mindful when slicing. Also note that the scotch bonnet peppers will make this very spicy (don’t use the seeds if you want to tame it down a bit) and to wash your hands with soap and water immediately after handling such HOT peppers.
Save the pan drippings to pour over the sliced jerk pork, especially if you’ll be making sandwiches with the meat. That low and slow heat will certainly develop similar flavors to having made this over a coals fire.. so no big deal when it’s – 30 C outside during the winter months in Canada. Chris will still get his Jerk Pork fix!
This is a re-do of a recipe I shared a few years back, but with closer attention you’ll notice that the technique is a bit different. Somewhat a perfected recipe based on repetition and tweaking. Still trying to find that elusive way my mom (and I have watched her do it too) and her mom before her would prepare their curry shrimp with potato. In all honesty my grandma would over-cook the shrimp (typical Caribbean way of cooking), but the taste was supreme (as I remembered).
You’ll Need…
1 lb medium shrimp (peepled, deveined and washed)
4 medium potato (large chunks)
1 tablespoon Caribbean Green Seasoning
1/2 teaspoon black pepper (divided)
3/4 tablespoon salt (divided)
2 1/2 tablespoon Curry powder (divided)
2 – 3 tablespoon veg oil
1 small onion (diced)
4 cloves garlic (diced or crushed)
2 cups water
4-6 wiri wiri peppers (any hot pepper – as much as you can handle)
1/4 teaspoon cumin seeds
1 tablespoon cilantro (chopped)
Important! If doing this recipe gluten free, please go through the entire list of ingredients to make sure they meet with your specific gluten free dietary needs. Especially the curry powder you use, as some may contain flour as a filler/thickener.
Season the prepared shrimp (I washed it with the juice of half a lime and cool water), with the Caribbean Green Seasoning, 1 tablespoon of curry powder, 1/2 the salt and 1/2 the black pepper. No need to marinate for too long. 10 minutes is fine.
Heat 1/2 the veg oil in a wide pan over a medium heat, then add the seasoned shrimp to the pot and stir well. We’re only cooking this for 3 minutes, then remove them from the pot. We’re trying to cook the shrimp about 70% or so as to not have tough and chewy shrimp at the end. Plus add that lovely shrimp flavor to the complete dish, from the start.
Set the shrimp aside, then add the remaining oil to the same pan and heat. reduce the heat to low and go in with the onion and garlic – stir well. After 3 minutes add the wiri wiri (or whatever pepper you choose to use) along with the cumin seeds and cook on low for another minute. After which, go in with the remaining curry powder (I make my own blend, but I do like the Madras blends coming out of the Caribbean). Stir and try to cook off the rawness of the curry for 3-4 minutes (on low). It will go darker and grainy.
It’s now time to add the peeled, washed and cubed potato to the pot. I like having chunky pieces. Stir well to coat with that curry goodness we created. Then turn up the heat and add the water to the pot. As it comes to a boil (I had the cover on the pan) add the remaining salt and black pepper.
Reduce the heat to a simmer and cover the pot slightly ajar and cook until the potato pieces are tender and falling apart. This takes about 20-25 minutes depending on the type of potato you use and how big the pieces are.
It’s now time to turn the heat up to medium high, add the precooked shrimp back to the pot and stir well. Use your spoon to crush some of the pieces of potato if you want a more thicker gravy. After 3 minutes, your curry shrimp with potato will be completed. Add a bit of chopped cilantro or shado beni if you want to add a bit of flair (looks great with the specs of green herb) and another punch of fresh flavor.
Such a simple dish, but so delicious and rich in tradition. Just about every household in the Caribbean (especially those with East Indian roots), got their own version of this method of cooking and the dish itself.
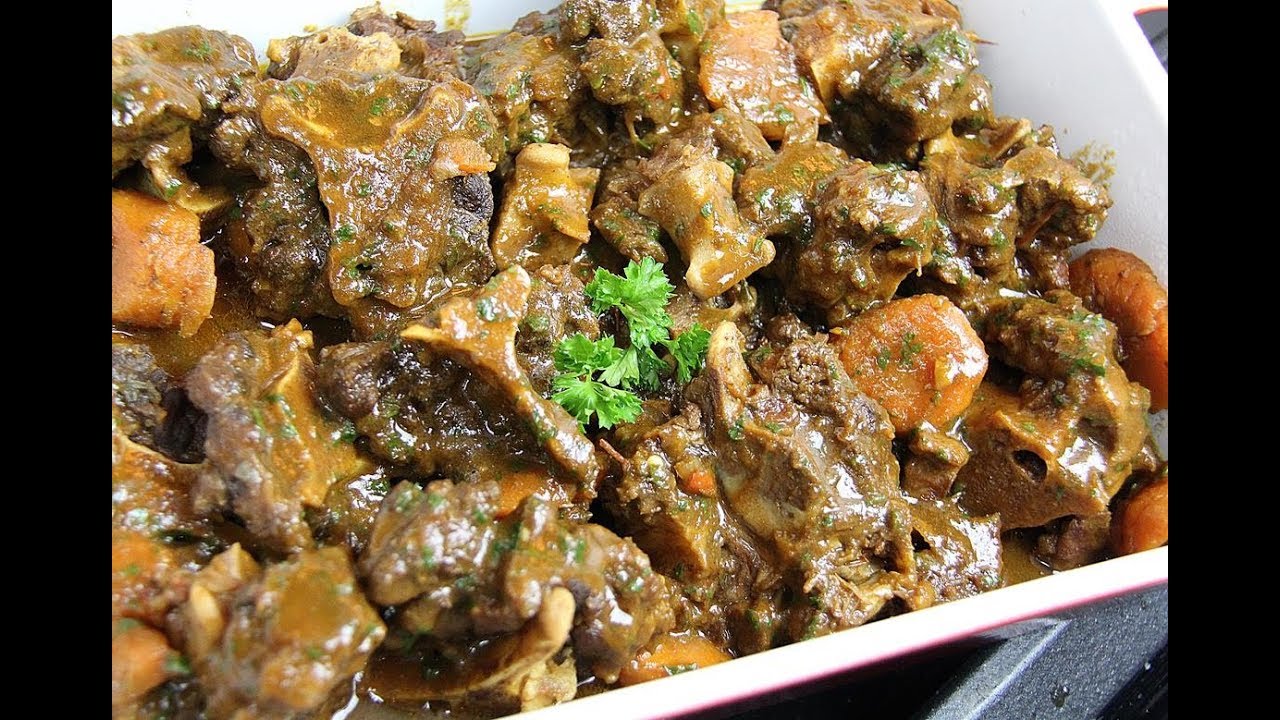
With the overwhelming success (and demand for more crockpot recipes) of the Slow-cooker Curry Goat recipe, I thought I’d share another Caribbean classic done in the very same crock-pot (slow-cooker). Fall off the bone tender oxtail, in a rich stew gravy like moms and grandma make, but in a slowcooker. Seasoned as we’d normally do in the Caribbean, these oxtails are slowly braised for tenderness and to infuse every piece with tons of mouth-watering flavor. Set it and forget it.. the perfect recipe for busy (and lazy) individuals.
You’ll Need…
4-5 lbs oxtails (cut, trimmed and washed with water and lime or lime juice)
3/4 tablespoon salt
1/4 teaspoon black pepper
1 tablespoon Caribbean Green Seasoning
1 teaspoon Worcestershire sauce
1 scotch bonnet (optional)
2 tablespoon tomato paste (concentrated tomato)
4 sprigs thyme
1 large tomato (diced)
2 scallions (chopped)
3-5 cloves garlic (smashed)
1 medium onion (diced)
1/2 teaspoon Caribbean Browning
1 teaspoon dark soy sauce
1 star anise
1 large carrot (cut into thick wheels)
1 teaspoon grated ginger
1 Bay-leaf
1 beef cube (stock)
1 cup water
1 1/2 teaspoon brown sugar
1 1/2 tablespoon parsley (chopped fine)
Important!If doing this recipe gluten free, please go through the entire list of ingredients to make sure they meet with your specific gluten free dietary needs. Especially the soy sauce, browning and Worcestershire sauce. Remember to wash your hands with soap and water immediately after handling Scotch Bonnet peppers.
Place the prepared oxtails (get your butcher to cut it for you – 1 inch pieces) into a large bowl or in the crock pot you’ll be using. For better results you can season and marinate this overnight. I didn’t.
Add the salt, dark soy, grated ginger, tomato paste (puree), Caribbean Green Seasoning, black pepper, Worcestershire sauce, thyme, scallions, garlic, onion, carrot, tomato, star anise, scotch bonnet, Caribbean Browning, 1 beef stock cube and water. Mix and marinate if you want.
Set the slowcooker to high and add the bay leaf and brown sugar. Cover and let it cook on high for 5 1/2 hours or until fork tender. Times may vary depending on how thick you cut your oxtails, how old the cow was when butchered and the temperature of your slowcooker.
After 5 1/2 hrs, taste for salt and adjust accordingly. Remove the pieces of oxtails and big pieces of carrots and set aside. Pour the gravy into a sauce pan and bring to a boil. Reduce by about 30%, then use a whisk or potato masher and break everything up in the pan to thicken. Being careful, strain so all the thick stuff is removed and you have a smooth sauce. Bring back to a simmer and add the parsley. Adjust the salt if you wish. (watch the video below to follow along).
Pour 1/2 (or all) onto the oxtails we set aside and the rest can be saved to a gravy boat to pour onto any starch you serve these tasty oxtails with.
Packed with tasty Caribbean flavors and fork tender, there’s no easier way to make stewed oxtails. Your family, friends and tastebuds can thank me later (smile).
Set-it-and-forget-it Caribbean-style oxtails slow-cooked with fragrant herbs, aromatics, and hearty gravy for melting tenderness.
Ingredients
Instructions
Video
In a slow cooker add Oxtail (4 pound).
Season with Salt (3/4 tablespoon), Dark Soy Sauce (1 teaspoon), Fresh Ginger (1 teaspoon), Tomato Paste (2 tablespoon), Green Caribbean Seasoning (1 tablespoon), Worcestershire Sauce (1 teaspoon), Ground Black Pepper (1/4 teaspoon), Fresh Thyme (4 sprig), Scallion (1 bunch), Garlic (3 clove) and Onion (1).
Add in the Tomato (1), Carrot (1), Star Anise (1), Bay Leaf (1), Scotch Bonnet Pepper (1), West Indian Browning (1/2 teaspoon), Beef Stock Cube (1) and Water (1/2 cup).
Mix everything well and add Brown Sugar (1 1/2 teaspoon).
Set your slow cooker on high and let it cook for 5 1/2 hours.
Remove the bay leaf, sprigs of thyme and star anise.
Remove the meat from the gravy and set aside.
Skim the fat off the gravy and add it to a pan set over medium heat.
Whisk it continuously to reduce the sauce.
Strain the gravy and reduce further. Add in the Fresh Parsley (1 tablespoon).