Important! (save the hate)… I posted this recipe within the “Vegetarian” category as well. As explained in the video below, you may leave out the stewed chicken should you prefer for a fully vegan/vegetarian dish. With an abundance of Chorai Bhagi (aka, Jamaican Callaloo or Spinach) in my garden this year, naturally I could could not allow any to go to waste.
You’ll Need…
2 lbs Chorai Bhagi (prepared) 1 medium onion (sliced) 7 cloves garlic (smashed) 1/2 teaspoon black pepper 1/2 teaspoon salt 2 tablespoon olive oil 1/2 scotch bonnet pepper (optional) 2 tablespoon pure coconut cream Leftover Stewed Chicken (Caribbean style)
Important! If doing this recipe gluten free, please go through the full list of ingredients to make sure they meet with your specific gluten free dietary needs. I used scotch bonnet pepper in the recipe, but you can leave it out should SPICY not be your thing. Additionally, you can use any spicy pepper you like or can access. Should you wish to add some diced tomato to the dish, it will add a lovely subtle flavor to things.
Wash and trim the leaves off the stems (I didn’t use any stems this time, but you can), then roll the Chorai into bundles you can handle and cut into ribbons 1 centimeter thick.
Heat the oil in a deep pot on a medium flame, then add the prepared Choria Bhagi to the pot and stir well.
Add the salt, black pepper, garlic and onion. Stir well!
It’s now time to add the coconut cream and scotch bonnet pepper should you decide to have the dish with a kick. Yes I kept the seeds.. trim off the seeds and white membrane around the seeds to control some of the heat (discard).
Remember to wash your hands with soap and water after handling such HOT pepper.
Place the lid on the pot and cook for 10 minutes. It will wilt and lessen in amounts.
Add the leftover Stewed Chicken, stir well and place the lid back on for another 5 minutes.
Here’s when you personalize things to your liking. Taste and adjust the salt and you need to decide if it’s as ‘cooked’ as you like. In my case I removed the lid and cooked it for a further 3 minutes to burn off the liquid at the bottom of the pot.
Luckily I had some Sada Roti in the fridge my mom sent us home with the last time we visited, but it’s also EXCELLENT with Rice or dumplings.
As we continue to explore the rich and diverse culinary culture of the Caribbean from a #MeatFree perspective, I’ve retooled the original version of this classic Caribbean recipe to be fully vegetarian and vegan. You’ll notice subtle differences from the traditional way of doing this dish, as explained in the video down below.
You’ll Need…
1 1/2 lb baby banana (chiquito) 1/2 medium onion (sliced) 1 1/2 tablespoon butter 4-6 cloves garlic (diced) 1/4 teaspoon black pepper 1/2 red bell pepper (chopped) 1/2 green bell pepper (chopped) 5 Grape tomatoes (cut in 1/2)
Notes! If doing this recipe gluten free, please go through the full list of ingredients to make sure they meet with your specific gluten free dietary needs. To make this fully vegan, replace the butter with olive or coconut oil. I encourage you to watch the video below as I explain a few other things in there, not covered here. I used grape tomatoes in the dish but you can use a regular medium tomato diced.
Heat the butter on a medium flame in a sauce pan (I used a non-stick pan), then add the onion, garlic, bell peppers and black pepper. Cook for 2-3 minutes, then turn the heat down to med/low and add the garlic.
About 4 minutes after adding the garlic, turn the heat back up to medium and add the peeled baby bananas (we say chiquito fig) to the pan, along with the tomato. Stir well to coat the bananas with everything. Add the salt and cover the pan. Feel free to add thyme and chopped scallions if you wish.
Turn the heat to medium/low and cook until the bananas are tender and have taken on some color. In my case it took about 10 minutes from the time I added them to the pan. Remember to stir well every 3-4 minutes.
This is a full meal on it’s own (2 people) or you can have it as a side to your other fav dishes. In the classic version salted Cod is added to the vegetables and the Chiquito bananas are pre-boiled before being added to the pan and refried.
Yet another version of String Beans as adapted from memories of growing up in the Caribbean. Pali (my nickname for Zyair Rook) and I were busy cleaning the weeds in the garden when we noticed that the beans we planted mid-spring had a bunch of beans ready for harvest. We harvested and cooked!
You’ll Need…
1 lb string beans 2 tablespoon olive oil 1/4 lb salted cod (prepared) 1 medium tomato (diced) 1 medium onion (sliced) 2 scallions (chopped) 1/2 bell pepper (sliced) 4 sprigs thyme 2 tablespoon water 1/2 teaspoon black pepper 4-6 cloves garlic (diced)
Note! If doing this recipe gluten free please go through the full list of ingredients to make sure they meet with your specific gluten free dietary requirements. I used Salted Cod, but you can use your fav dry/salted fish. There were no spicy peppers (like Scotch bonnet) used in the recipe as explained in the video below.
Wash the string beans, then remove the ends and discard. Chop or break into 1 to 2 inch pieces and set aside. For the Salted Cod, I placed it in a bowl then added boiling water onto it. When it was cool to touch I squeezed out the water, rinsed with cool water.. squeezed out that water and shredded it into bits. Note that I used boned (boneless) salted Cod, but I still kept an eye out for any bones.
Heat the olive oil in a wide pan on a medium flame, then add the prepared salted Cod, followed by the onion, garlic and black pepper. Reduce the heat to low and cook for 4 minutes. Add the bell pepper (optional), thyme, scallions and should you decide to add any spicy pepper, do so now. Cook a further 3 minutes.
Turn the heat back up to medium and add the prepared String Beans (French beans will work too) and stir well.
Add the water and bring to a boil with the lid on.
Toss in the tomato, turn the heat down to a simmer and cook for 15 minutes with the lid on.
It’s now time to personalize things a bit. Check for salt and add if necessary, I didn’t add any as explained in the video, and should there still be liquid at the bottom of the pot, remove the lid (as I did) and cook a further 5 minutes with the lid off.
Personally I like the beans with a slight bit of body. We had it with Sada Roti in case you’re curious. But it’s just as delicious as a topping for steaming rice.
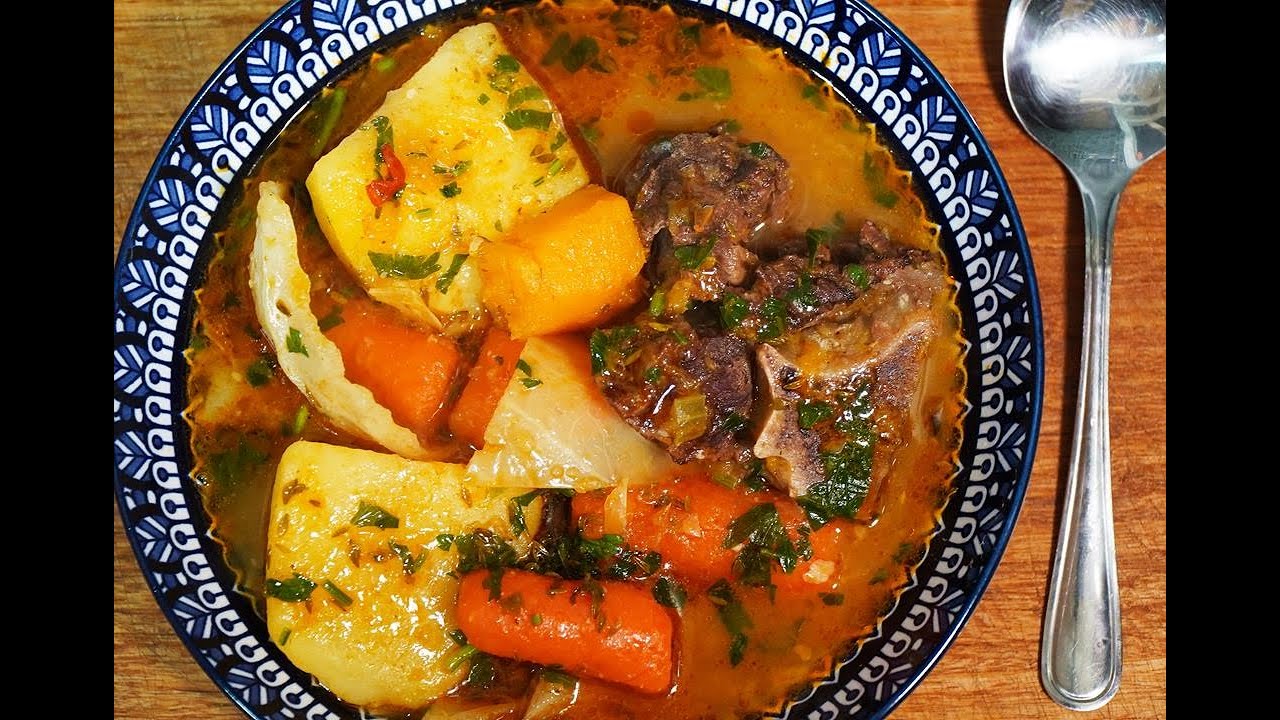
Over the years I’ve shared about 30 + Soup Recipes and to be honest and frank, I’ve barely touched the surface when it comes to Caribbean and Caribbean inspired soup recipes. Such is our love for soups throughout the Caribbean. While this one is not your typical thick and ‘stew’ like variety you’d normally enjoy on the Islands, it is packed with deep Caribbean flavors.
You’ll Need…
3 lbs beef neck bones 3 tablespoon olive oil 2 large head garlic 1 large onion (diced) 2 stalks celery (chopped) 1 teaspoon black pepper (divided) 1 1/2 tablespoon concentrate tomato paste 1 tablespoon salt 8 sprigs thyme 2 thick slices ginger 1 scotch bonnet pepper 10-14 cups hot water 3 medium carrots (cut large) 5 medium potatoes (cut in half) 1 1/2 lbs pumpkin (large pieces) 1 small cabbage (cut in large pieces) 2 tablespoon chopped parsley
Notes. Be sure to get your butcher to cut the bones for you, as you will not be successful with your clever or large chef’s knife. Any beef bones will work, in my case the neck bones I used had a fair bit of meat on it. If you’re doing this recipe gluten free, please go through the full list of ingredients to make sure they meet with your specific gluten free dietary needs.
Preheat your oven to 375 F. Wash the pieces of neck bones to remove any grit it may have from being cut on the band saw. Pat dry, then place in your roasting pan along with the garlic (skin on – I cut each head in half). Drizzle on the olive oil to coat everything.
Place a sheet of foil over the pan lightly and roast for one hour in the oven.
Remove the fat from the bottom of the roasting pan and place in your large soup pot on a medium/low flame. Add the onion, celery, 1/2 the black pepper, garlic we roasted (once cool, they will fall off the skin) and cook for 3 minutes. Then add the tomato paste and cook for another 2 minutes.
Add the roasted beef bones and stir well to coat. Then add the ginger, thyme (I tied them with string so later on they will be easier to remove) and float in the Scotch Bonnet pepper – DO NOT Break! Explained in the video.
Top with the water, turn up the heat to medium/high and bring to boil. Reduce to a gentle rolling boil. At any time you may watch the video below should you have any relating questions.
As it comes to a boil, add the carrots. Cook for 1 hours and 40 minutes. Then remove the ginger pieces, the thyme and at this point you will decide if you want to remove the Scotch Bonnet or break it to release the beast (heat). They’ve all done their respective jobs.
Add the pumpkin pieces along with the cabbage.
Bring the soup back up to a boil and cook for another 30 minutes or until the potato is tender. Please try to NOT over-stir as we don’t want to crush the carrot, pumpkin nor potato. The goal is to have a tasty broth with chunky pieces of vegetables.
At this point there may be pieces of bones where the meat fell off, you may remove those bones and discard. Taste and adjust the salt to you liking. The final step is to add the remaining black pepper and parsley. Turn off the stove.
TIP! You may add pieces of boneless pieces of beef (about 1 to 2 inches thick) to the soup at the start if you wanted (do not roast). And should you want an even more pronounced Caribbean flavor, add a tablespoon of homemade Caribbean Green Seasoning to the pot when you add the potatoes.
This hearty Caribbean beef bone soup combines roasted beef neck bones with a variety of root vegetables and traditional spices for a soul-warming dish that’s perfect for sharing.
Ingredients
Instructions
Video
Preheat your oven to 375°F (190°C).
Wash the beef neck bones to remove any debris. Pat dry and place in a roasting pan along with the halved garlic heads. Drizzle with olive oil to coat.
Cover the pan lightly with foil and roast in the preheated oven for 1 hour.
In a large soup pot, add the fat from the roasting pan and heat over medium-low flame. Add diced onion, chopped celery, half the black pepper, and the roasted garlic (skins removed). Cook for 3 minutes.
Stir in the tomato paste and cook for another 2 minutes.
Add the roasted beef bones to the pot, stirring to coat. Add ginger slices, tied thyme sprigs, and the whole Scotch Bonnet Pepper (do not break).Add the roasted beef bones to the pot, stirring to coat. Add ginger slices, tied thyme sprigs, and the whole Scotch Bonnet Pepper (do not break).
Pour in 10–14 cups of hot water, ensuring all ingredients are submerged. Increase heat to medium-high and bring to a boil.
Once boiling, reduce to a gentle rolling boil. Add the carrots and cook for 1 hour and 40 minutes.
Remove ginger slices, thyme sprigs, and Scotch Bonnet Pepper (or leave for added heat). Add potatoes, pumpkin, and cabbage to the pot.
Bring the soup back to a boil and cook for an additional 30 minutes, or until the potatoes are tender. Avoid over-stirring to maintain vegetable integrity.
Remove any bones that have separated from the meat. Adjust salt to taste. Stir in remaining black pepper and chopped parsley.
Ladle the soup into bowls, ensuring each serving has a mix of meat and vegetables. Enjoy hot.
While Bodi was never on my top 20 list of things mom would cook while growing up on the islands, it’s definitely grown on me in my adult years. Yes, I’ve shared MANY Bodi recipes over the last few years, but this one is as traditional and basic as it gets.. without sacrificing flavor and overall taste. Basically it’s my fave!
You’ll Need…
1 lb bodi (aka bora, yard bean, long bean) 2 tablespoon olive oil 1 medium onion (diced) 1 mediun tomato (diced) 1/4 teaspoon black pepper 1/2 teaspoon salt (adjust) 4-6 cloves garlic (smashed)
Important! There’s a full tutorial video below to follow along to make cooking this delightful vegan dish as easy as possible. Should you want a little kick, add a bit of your favorite hot pepper to the pot. If making this dish gluten free, please go through the full list of ingredients to make sure they meet with your specific gluten free dietary requirements.
Trim the ends of the bodi and discard, then cut into 1 inch pieces. Rinse will cool water and drain.
In a saucepan (one with a lid) on a medium flame, add the olive oil, followed by the diced onion. Stir, lower the heat to medium-low and cook for 2-3 minutes. Then add the garlic and black pepper.
Cook for a further 3 minutes (lower the heat if you find that the garlic is starting to burn), then add the prepared bodi. Stir well to coat with that flavored oil.
Turn the heat up to medium, add the diced tomato and place the lid on the pan. If you wanted to add any spicy pepper, here is where I’d recommend you do. After about 3 minutes you should see it starting to boil (yes it will release it’s own juices along with the steam liquid). Turn the heat down to medium/low again and cook with the lid on. Should the pan be dry, add 1/4 cup of water.
After about 20 minutes (be sure to stir every 5 minutes or so) it’s time to personalize things a bit. Taste and adjust the salt to your liking and then decide if the Bodi is as tender as you like. I removed the lid and cooked with the lid off for a further 5 minutes as I wanted things a bit dry, rather than with any juices on the bottom.
Usually mom would cook it until it just starts falling apart, but I like the slight texture from cooking it my way. No she does NOT need to know this.
For extra flavor you may add 1/2 teaspoon grated ginger and the odd time I would also add a teaspoon of Hoisin Sauce to the pot. The two ways I enjoy this fry (fried) bodi is with Sada Roti or as a simple topping for hot rice.
I did it again.. Apple Kuchela, that iconic spicy condiment enjoyed with curry dishes, traditionally made with green mangoes in the Caribbean. While almost identical to the original recipe I shared about 10 years ago, you will find more tips and explanations in the video below than when I first posted the recipe.
You’ll Need…
8-10 Apples (see note below) 1 teaspoon salt Hot Peppers (crushed) 10-15 cloves garlic (crushed) 4-5 tablespoon Anchar Masala 1 cup veg oil (adjust)
Notes! I used Granny Smith (green) apples (explained in the video below), however any tart/firm apple will work. Kuchela is basically a SPICY condiment (side) you enjoy predominantly with curry dishes, so I used 8-12 Wiri Wiri peppers (I didn’t have Scotch Bonnets on hand). Feel free to use any spicy peppers you like or can access. Finally, remember to wear gloves when handling hot peppers and wash your hands with soap and water immediately after.
May I recommend that you wash the apples you use really well as many in the grocery stores may have a protective wax on them. Or you can buy organic apples which are not normally dipped in that wax (still wash well). Then all you have to do is grate then into shreds.
Yes, it will go discolored (explained in the video below) so don’t fret. It’s time to now squeeze most (if not all) the juice from grated apples (use a cheese cloth to assist if you want) and place it on a baking sheet. That sheet is then placed in direct sun to further dry. The goal is to have grated apples which will soak-up the flavor ingredients we’ll add later. I placed the sheet on the hood of my car in the direct sun, as the radiant heat sped-up the drying process.
It will take between 2-3 hours. If it’s not sunny outside, place the tray in a low oven for a few hours.
You may use a food processor or blender for the next step, but I opted for my mortar and pestle. Add the salt, (it will act as an abrasive) garlic and peppers and crush. You can go until smooth or chunky as in my case.
In a (cold) wide pan, add the vegetable oil and the crushed mixture. Turn the heat to low and gently bring up to a simmer. Cook on that gentle simmer for 3-4 minutes (basically to flavor the oil and to cook out some of the rawness). Turn off the stove now.
Add the dried grated apples to the pot, followed by the anchar masala (check online or your fav Caribbean grocers) and stir well.
It’s now time to get your clean glass containers ready to fill up with this wicked Apple Kuchela. I store mine in the kitchen cupboard and it keeps for months.
Remember to adjust the salt and add more oil should you find that it’s overly dry. Use an oil that’s low in flavor as it will affect the flavor of the finished Kuchela. Feel free to use a dehydrator if you have access to one to dry the grated apples.