While mom’s choice for making this dish was always canned (we say ‘tin’ in Trinidad and Tobago)Salmon, using tuna which can be a lot cheaper, is just as tasty. A wonderful weekday dinner, served with steamed or boiled rice (your choice of rice) and sides of sliced avocado and cucumber. You’ll be eating in as much time it takes to cook the rice as this stewed tuna takes less than 15 minutes.
You’ll Need…
2 cans Tuna (in water) 2 scallions (chopped) 1/2 medium onion (sliced) 1 tablespoon tomato paste 1 teaspoon lemon juice 3 cloves garlic (crushed) 1 medium tomato (diced) 2 sprigs thyme (leaves only) 1 tablespoon olive oil 1/4 teaspoon black pepper 1 tablespoon chopped celery leaves (optional) 1 teaspoon tomato ketchup salt (see notes below)
Notes! I used celery leaves at the end, but you’re free to use parsley, cilantro or culantro (shado beni). While I didn’t want this spicy and didn’t use any hot peppers, you can tailor the heat to your liking by adding hot pepper/s of your choice. Should you be doing this recipe gluten free, please go through the full list of ingredients, especially the canned tuna you use, to make sure they meet with your specific gluten free dietary needs. I didn’t add any salt as I find that the sodium content in canned foods can be high, however you can taste and adjust near the end of cooking.
Heat the olive oil (or any oil you decide to use) on a medium flame, then add the onion, followed by the garlic and scallions. Turn the heat down to low and cook gently for 2-3 minutes.
Follow up with the tomato, black pepper and thyme leaves. You may want to turn the heat up to med/low at this point. Stir well and cook for another 2-3 minutes to soften everything.
Add the tomato paste and stir to combine.
It’s then time to add the tuna, along with the water from both cans and the tomato ketchup.
Stir well.. break up the tuna chunks if you wish and cook on a medium/low flame for 4 minutes. Top with the celery leaves and hit it with the lemon juice as you turn off the stove. Remember to taste for salt and adjust to your liking.
While hot rice is my preference for this dish, it works great with roti, ground provisions and if all fails.. sliced bread.
Growing up in the Caribbean at a time I did, making a decision to be vegan or stay away from meats was never really an option. There were days mom would make fish or meat dishes and there were days (many more) when vegetarian meals were prepared. Basically you ate or starved (nah was the norm, no cruelty ting eh).. except when she cooked bitter melon – myself, my brother and sisters would revolt. Much of what we ate came from our kitchen garden or what local farmers had for sale, so dishes like what I’m about to share comes naturally. Especially since most of what I’ll be using, came from my lil Caribbean Canadian garden.
You’ll Need…
2 1/2 tablespoon coconut oil 3/4 teaspoon turmeric 1 cup coconut milk 1/4 teaspoon salt 3/4 teaspoon black pepper 2 cups diced pumpkin 4 cups chopped Jamaican Callaloo (chorai bhagi) 4-6 pumpkin stems (baby leaves) 6 okra (cut) 1 green scotch bonnet pepper 5 sprigs thyme + 5-8 green beans 4-6 cherry tomatoes (cut in 1/2) 4 cloves garlic (smashed) 1/4 cup chopped chives (chopped) 1 medium eggplant (cubed)
Notes. Please watch the video below for more tips and explanation. Should you be doing this recipe gluten free, may I recommend that you go through the full list of ingredients to make sure they meet with your specific gluten free dietary requirements. Remember to wash your hands with soap and water immediately after handling such hot peppers as Scotch Bonnet. I explained why I used a green Scotch Bonnet in the recipe, in the video down below.
With most of the items coming from my garden, the first order of business was to give everything a good wash. Then it was a matter of chopping and dicing. While I do have a pumpkin patch, for some reason they didn’t even bloom this year. I made use of the pumpkin I had in the fridge from the local grocery. Butternut squash will would great too.
Heat the coconut oil (use olive if you prefer) on a medium flame in a deep pan (I used a cast iron pan) and add the cubed eggplant to the pan. I kept the skin on. Try to get color on all sides, then remove and set aside. Try to leave back as much of the oil in the pan.
With your flame still on medium, add the diced pumpkin and stir well to coat with the oil. After about 2-3 minutes, add the thyme (my stems were tender, so I added it all.. should yours be woody, pick the leaves off and only add them), garlic and chives. Turn the heat down to med/low and cook for 3 minutes. During this time you may add the black pepper.
It’s now time to add the beans, Scotch Bonnet okra and salt. Should you not want things spicy you may leave out the Scotch Bonnet, or add it whole and don’t break it. Cook for another 2-3 minutes, then add the chopped Jamaican Callaloo. Everyday Spinach, Kale or Swiss Chard will work to. At this point you may add the turmeric as well. Add the baby pumpkin leaves (explained in the video).
The Jamaican Callaloo (Amaranthus viridis Also known as: Slender amaranth, Slender pigweed) will pile up, but as it gets in contact with the heat, it will wilt down considerably. Top with the coconut milk and bring to a boil. Then reduce to a simmer.
After about 5 minutes on the simmer, add the pre-cooked eggplant back to the pan and cook for another couple minutes, so the lovely smokey flavors of the eggplant makes it’s way into the dish. We fried the eggplant at the start so it can maintain it’s shape and texture in the dish. The skin will add a lovely sweet note to.
Now it’s time to personalize things a bit. You can burn off all the liquid at the bottom of the pan or leave some if you need a little gravy for rice or boiled ground provisions. At this point I’ll suggest you taste for salt and adjust accordingly. I know if you’re following a strict Ital diet, you’ll want to go low on the sodium or leave it out altogether.
Just before I turn off the stove I like adding the tomatoes to the pan and allow the residual heat to gently blister them. Squeeze in some fresh lemon juice should you want and a topping of additional black pepper can brighten the dish further.
A delightful vegan dish, packed with goodness from my garden.
Here’s another recipe I resurrected after calls for it on Instagram. I originally shared a version of this Steak Marinade And Dressing about 10 years ago on the website, and while it’s a hit every summer with fans, many people are having a difficult time finding it. Here’s an updated version of my take on the Ultimate Steak Marinade and Dressing.
You’ll Need…
1/2 cup finely chopped Parsley 1/4 cup finely chopped thyme 1 cup chopped chives 1/2 cup diced tomato (2 medium tomatoes) 1 teaspoon pepper flakes 1 tablespoon golden brown sugar 1 1/2 tablespoon light soy sauce 1 1/2 tablespoon red wine vinegar 1 1/2 cup orange juice 1 1/2 cup extra virgin olive oil 3/4 teaspoon sa salt 1 teaspoon ground black pepper 2 lemons (juice) 1 medium onion (diced) 6 cloves garlic (crushed)
Notes! Should you want to give this marinade a more pronounced KICK, replace the pepper flakes with freshly diced Scotch Bonnet or any fiery pepper you enjoy. If doing this recipe gluten free, please go through the full list of ingredients to make sure they meet with your specific gluten free dietary needs.
Wash, drain, chop and dice everything as listed in the ingredient list.
Assemble in a large mixing bowl.
Whisk to combine it all. Should you want to replace the brown sugar with honey, that would be delightful. There are times I add both.
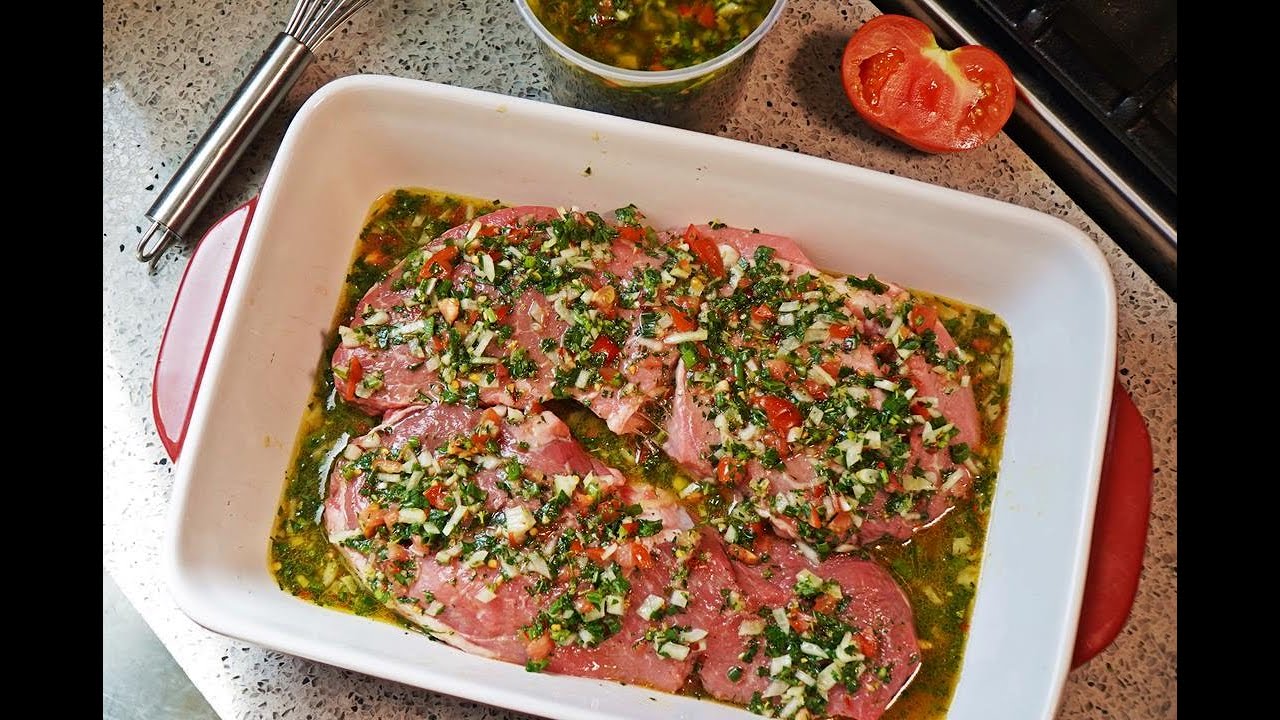
Spread 3 tablespoons of the marinade in the dish you’ll be marinating my steaks in, then on goes the steaks, followed by about 3/4 cup of the marinade over the steaks.
No I don’t season the steaks with any salt. After you grill them off, you may decide to sprinkle on your fav finishing salt.
Cover with plastic wrap and marinate in the fridge for at least 2 hours. Be sure to take it out of the fridge about 1 hr before you toss them on the grill. Yes, you need a HOT grill and for the first couple minutes you may drizzle on the marinade from the dish onto the steaks (I know people are weary about marinade that’s been on raw meats – this way it cooks off on the grill).
The remaining marinade is stored in plastic containers in the fridge for up to 2 weeks. After the steaks comes off the grill and sliced, the marinade then becomes a dressing to drizzle over the cooked steaks.
This marinade works great with poultry, fish and pork as well. May I recommend using this marinade on cheaper cuts of beef to add additional flavor and to help tenderize the meat a bit. I used sirloin tips steaks (as seen in the images).
This vibrant Caribbean-style steak marinade layers fresh herbs, savory seasonings, and subtle heat for a bold flavor profile that works beautifully with pork, poultry, and fish.
Ingredients
Instructions
Video
Wash, drain, chop and dice everything as listed in the ingredient list.
Assemble in a large mixing bowl.
Whisk to combine it all. Should you want to replace the brown sugar with honey, that would be delightful. There are times I add both.
Spread 3 tablespoons of the marinade in the dish you’ll be marinating my steaks in, then on goes the steaks, followed by about 3/4 cup of the marinade over the steaks.
No I don’t season the steaks with any salt. After you grill them off, you may decide to sprinkle on your fav finishing salt.
Cover with plastic wrap and marinate in the fridge for at least 2 hours. Be sure to take it out of the fridge about 1 hr before you toss them on the grill. Yes, you need a HOT grill and for the first couple minutes you may drizzle on the marinade from the dish onto the steaks (I know people are weary about marinade that’s been on raw meats – this way it cooks off on the grill).
The remaining marinade is stored in plastic containers in the fridge for up to 2 weeks. After the steaks come off the grill and sliced, the marinade then becomes a dressing to drizzle over the cooked steaks.
This marinade works great with poultry, fish and pork as well. May I recommend using this marinade on cheaper cuts of beef to add additional flavor and to help tenderize the meat a bit. I used sirloin tips steaks (as seen in the images).
Summertime I look no further than my garden for inspiration for meals to make. With an abundance of chives and Jamaican Callaloo (chorai bhagi)and previously harvested garlic, I decided to put the leftover rice I had in the fridge, to use.
You’ll Need…
3 cups chilled pre-cooked rice (cooked in salted water) 1 lb Jamaican Callaloo (chorai bhagi aka spinach) 1 1/2 tablespoon grapeseed oil 6 chives (chopped) 1/3 red bell pepper (diced) 1/3 yellow bell pepper (diced) 1 1/2 tablespoon mushroom soy sauce 6 cloves garlic (sliced thin) 6-10 cherry tomatoes (1/4) Salted Cod (I used a little less than 1/4 lb) 1 teaspoon Sesame oil
Notes. Feel free to leave out the bell peppers if you wish. As explained in the video below, they were about to go bad in the fridge, so in the pot they made an appearance. Should you want this rice dish spicy, add some chili oil or finely diced hot pepper of your choice. I used par-boiled brown rice, but you’re ok using any rice you have on hand or enjoy. If doing this dish gluten free, please go through the full list of ingredients to make sure they meet with your specific gluten free dietary needs.
Wash the Jamaican Callaloo, remove the leaves and chop (explained in the video). May I recommend you prep the other ingredients in advance as well, as this is a very quick dish to put together. With the salted Cod, I poured boiling water over it, in a bowl. When it was cool to touch, I drained, squeezed out the water and flaked. I used boned (bones removed) salted cod, however I still looked for any bones which may still be present (remove and discard).
In your wok or frying pan on a medium heat, add the oil (I only used Grapeseed oil as that’s the only oil I had on hand – use olive, veg or coconut oil if you wish), followed by the salted Cod. Cook for 3 minutes, then add the sliced garlic and bell peppers. Cook for 2-3 minutes, then add the chives.
Cook for another minute then add the prepared Jamaican callaloo. It may look like a lot, but it will wilt down quickly. As it does, give everything a good mix.
About 3 minutes in, add the mushroom soy sauce.
Toss in the tomato and cook for about 5 minutes on a medium low heat. Natural juices will sprout. Turn up the heat at this point to burn off that liquid before adding the chilled rice. Yes, chilled rice will give you a more grainy fried rice at the end.
Top with the sesame oil and stir well to combine everything. Your heat should be on medium as all we need to do now is heat the rice through and we’re done. I’m not the biggest fan of sesame oil so I went in light, but you can add more if you wish. A little Oyster sauce would be nice in here, should you want to add a tablespoon or so.
Before you turn off the heat, taste for salt and adjust accordingly. Since the rice was cooked in salted water, the salted cod had remnants of the salt it was cured in and the mushroom soy sauce was a bit salty… I didn’t add any salt.
A wonderful summertime lunch, inspired by my lil kitchen garden.
I originally shared a Curry Stew(ed) Chicken recipe back in 2009 and like the Caribbean Green Seasoning recipe I updated a couple days back, it’s now buried under hundreds of newer recipes. So while it’s not my intention to repeat recipes, you’ll find some subtle differences with this one, plus I had several requests for a ‘new’ version after I teased a video clip on Instagram.
You’ll Need…
3 lbs chicken wings (trimmed) 2 tablespoon curry powder 1 medium tomato (diced) 1 medium onion (diced) 1 tablespoon grated ginger 2 tablespoon Caribbean Green Seasoning 3/4 teaspoon salt (adjust) | 1/2 teaspoon black pepper 1 teaspoon tomato ketchup 1 Scotch Bonnet pepper (see note below) 1 1/2 tablespoon Grapeseed oil (see note) 1 1/2 tablespoon golden brown sugar 2 scallions (chopped) 1 tablespoon chopped celery leaves 2-3 cups water
Notes! I used an entire Scotch Bonnet pepper in the recipe as I enjoy spicy food. You have the option to use less or none at all. Additionally you may remove the seeds and white membrane from the pepper to cut back a bit of the heat. Yes, you can use any spicy pepper you enjoy or have access to. I opted for grapeseed oil since I was out of olive oil, however you may use any oil you like. Do note that we’ll start the dish on a high heat, so the smoke point of the oil you use may be a factor. If doing this recipe gluten free, please go through the full list of ingredients to make sure they meet with your specific gluten free dietary requirements. Especially the curry powder you use as some may contain fillers.
For best results, may I recommend seasoning the chicken wings (yes you may use other cuts of chicken with similar results) and marinate for at least 2 hours in the fridge.
Cut the wings into drumettes, flats and tips. You may keep the tips for making chicken stock.. I don’t. I’m from the Caribbean where we wash our meats, but that’s up to you (water and lemon, vinegar or lime juice) as I know we’ve been warned not to wash chicken. With clean, trimmed and drained wings in a large bowl, add the salt, tomato, curry powder (this is the curry element), black pepper, grated ginger, ketchup, onion, Caribbean Green Seasoning and Scotch Bonnet Pepper. Give it a good mix and into the fridge to marinate. Should you be pressed for time, you can start the “stew” process immediately.
I’ve included 2 videos below where you may find this ‘stew’ step better explained. In a heavy pot on a med/high heat, add the oil followed by the brown sugar. The sugar will melt, go frothy, then a deep amber in color. This is when you’ll carefully start adding the seasoned chicken wings to the pot and stir well. Should the sugar go black STOP, allow the pot to COMPLETELY cool , wash, dry and start back with new oil and sugar. Should it go black and you continue the finished dish will be very bitter tasting.
Turn the heat to medium/low, cover the pot and let it cook for 5-7 minutes. Natural juices will sprout up. At this point, remove the lid, crank up the heat and burn off that liquid. Add 2 cups of water to the same bowl you marinated the wings in and swish around to pick up any remnants of the seasonings. Once you can start seeing the oil we stared off with at the bottom of the pot, add the water and bring to a boil.
Once it comes to a boil, place the lid on slightly ajar and reduce to a rolling boil.
Should the water level be low and the chicken not fully cooked, add the additional cup of water to the pot. Twenty minutes later and your curry stew chicken wings will be fully cooked. It’s now time to personalize things. Taste and adjust the salt and decide if the gravy is thick enough to your liking. In my case I cooked it for a further 4 minutes to thicken up. But do keep in mind that the residual heat from the pot will thicken it further. So too when it cools.
Top with the scallions and celery leaves (use parsley if you don’t have the celery leaves) and turn off the stove.
Curry Stew Chicken Wings done! To recap and clarify as I know there are different versions of this curry-stew technique online and while I cannot find fault in the way people do their version, I must say that what I shared above is the original way in cooking curry stew. Basically you SEASON with the curry (powder) and STEW (caramelized sugar) to finish.
This is without any doubt, my fav way of enjoying wings – yes Buffalo Wings I said it. On it’s own or as a side to your fav carb.
Yes, I’ve shared a few Caribbean Green Seasoning videos on YouTube and Facebook, and while I have shared a version here on the website, that recipe dates back to 2009 and since then over 700 recipes have since buried it. Basically people are having a difficult time finding it. If you’re not familiar with Caribbean Green Season, it’s the go-to marinade for our poultry, meat, fish + seafood and vegan/vegetarian dishes.
You”ll Need…
750 ml Olive Oil 15-18 scallions .226g (about 1/2 lb) garlic 3 cups chopped parsley 6 Pimento peppers (aka seasoning pepper) 2 Green Scotch Bonnet Peppers (see note below) 2 cups chopped Cilantro (coriander – see note below) 1 bundle Thyme (about 50-70 sprigs) 1 cup chopped celery (leaves)
5 Italian roaster Peppers
Note. Please watch the video below as I explain a few things concerning the ingredients of my (and potentially your) Caribbean Green Seasoning. Especially why I DO NOT recommend adding ginger, rosemary and basil. Further to what I mentioned, I find that since Basil is a delicate herb and, it’s better used fresh. If I had more seasoning peppers (Pimento) I’d use those instead and not the Italian Roaster Peppers (Cubanelle works too). Since I didn’t have time to drive to Toronto to get Chadon Beni (culantro) I opted for Cilantro. Usually my garden has Spanish Thyme (big leaf aka podina), sadly not this year. Should you do decide to use Rosemary and you have Spanish Thyme, do use sparingly as there are very pungent and can overwhelm your Green Seasoning. As explained in the video I use Olive or Grape Seed oil as my base as it helps to maintain the vibrant color and flavor of the finished green seasoning. Traditionally people use water or vinegar. Finally, you’ll notice I didn’t use any onion in my Green Seasoning, as I find that it diminishes the shelf-life of it (goes bad quickly).
Start by washing the ingredients really well, especially the cilantro which can have a bit of dirt still attached to the roots. In washing, remove dead leaves and other debris.
Allow them to air dry on a kitchen towel, then give everything a rough chop to make it easier for your blender or food processor. I much prefer using a food processor as I can get it to the perfect texture and consistency. I like it somewhat thick and with a bit of body as compared to most people who basically liquify it.
With the Thyme, you may use the tender stems, but PLEASE Remove the woody ones and discard. They may not break down in the food processor and become a choking hazard when you use the Green Seasoning later on in your meals.
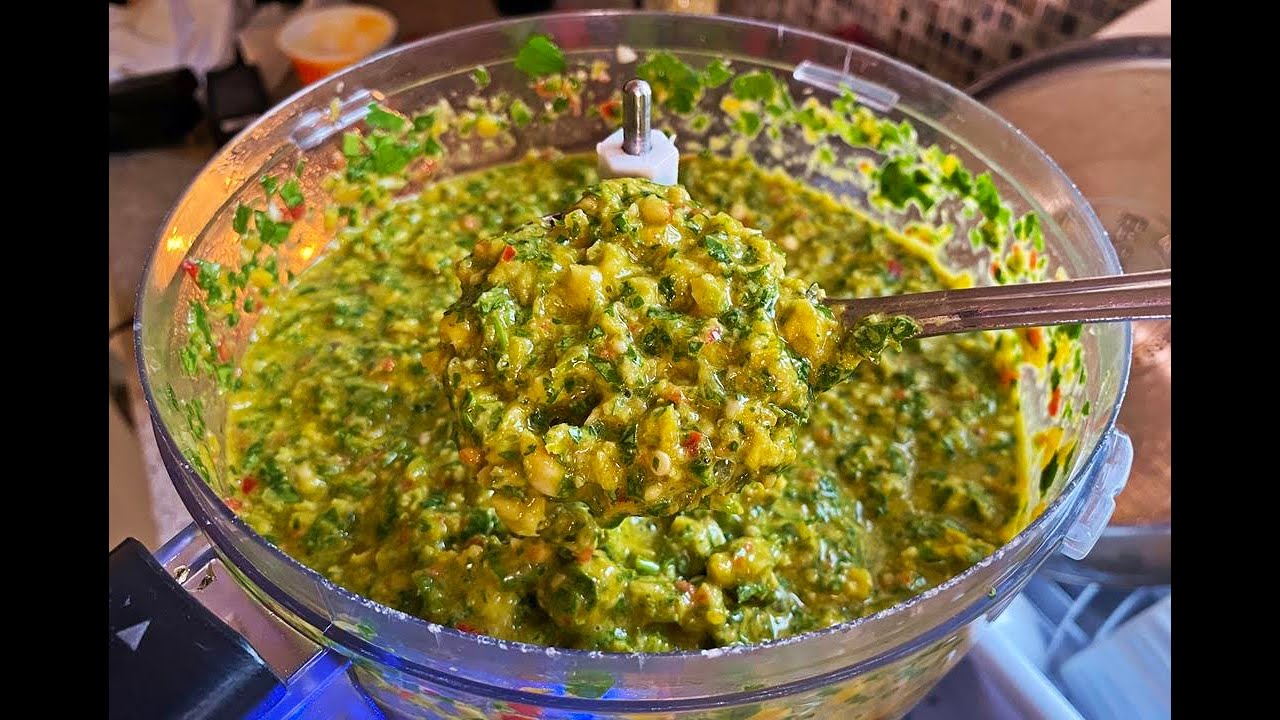
Stack (in layers) some of each ingredient, add about 1/2 the oil and pulse with your food processor (yes, you can use a blender as well). Stop to scrape down the sides and to keep adding more of the herbs, garlic and peppers.
I like layering the ingredients as I find I get a much better combination at the end. I did mine in two batches as this lot will make a few containers of Caribbean Green Seasoning.
I then fill up containers (save the ones after use as the Green Seasoning smell and taste will taint them), BUT leave about a cm space to the lid. Then to the back of the fridge where they live for the next couple months… until it’s time to make another batch. They will keep for at lest 6 months in the fridge if you’re wondering. Additionally you can freeze the Green Seasoning in ice trays, pop them out, then into a freezer bag and store in the freezer. Every time you need some, pop a cube out, instead of having to thaw a full container.
Difficulty:
IntermediatePrep Time10 minsTotal Time10 mins
Servings:
10
Description
A large-batch version of Caribbean green seasoning, ideal for meal prep and frequent cooking. This traditional blend of fresh herbs, peppers, and aromatics is a cornerstone of Caribbean cuisine, used to marinate meats, season stews, and elevate everyday dishes with bold, authentic flavor.
Ingredients
Instructions
Video
Wash all herbs and peppers thoroughly and allow them to air-dry. Roughly chop the herbs, garlic, and peppers to prep for blending. Remove woody stems from thyme; use only tender stems and leaves.
In a food processor or blender, add half of the chopped ingredients and half of the olive oil. Pulse until the mixture begins to blend.
In a food processor or blender, add half of the chopped ingredients and half of the olive oil. Pulse until the mixture begins to blend.
Gradually add the remaining ingredients and olive oil, blending until the desired consistency is achieved.
Transfer the green seasoning to clean glass jars, leaving about 1 cm (½ inch) of space at the top.