While I’ve shared various Jamaican Jerk Recipes, including Jerk Chicken, Jerk Pork, Jerk Salmon and even a killer Jerk Shrimp recipe, I’ve somehow avoided making one of the most requested recipes. A sauce or gravy to pour over whatever you’ve ‘jerked’ on the smoker or grill. A jerk sauce, not a jerk marinade nor BBQ sauce, that also doubles as a great dipping sauce.
You’ll Need…
1 tablespoon olive oil 1 medium onion (diced) 5 sprigs thyme 3/4 teaspoon allspice (pimento) 1 cup pineapple juice 1 teaspoon grated ginger 1 teaspoon Dijon mustard 1 cup tomato ketchup 3/4 – 1 cup brown sugar 3/4 cup spicy jerk marinade 2 cups chicken stock 2 tablespoon finely chopped chives 1 tablespoon raw honey 1/2 lemon (juice)
Notes. Please follow along with the video below as much more about the recipe is discussed there. Including why I opted for a spicy store bought jerk marinade and why it may not be necessary to add any salt in making this Jamaican Jerk gravy.
In a deep saucepan on a medium flame, add the olive oil followed by the onion. Give it a stir then reduce the heat to low and cook for 4 minutes.
Add the thyme (sprigs on is fine), and allspice and cook on low for another 2-3 minutes.
At this point turn the heat back up to medium and add the pineapple juice and bring to a boil. Then in goes the ketchup, brown sugar, Jamaican Jerk Marinade and mustard.
While it may seem strange, add the chicken stock and bring to a boil. Should you wish to keep this vegetarian, opt for vegetarian stock. Stir well and bring to a boil, then lower to a simmer and cook for 25-30 minutes.
It would have reduced by about a third. Remove the thyme stems and if you have a stick blender, give it a few pulses to break down the onion we started with. Turn the heat off, taste and adjust the salt to your liking. Regarding the sugar we added, may I suggest you add 3/4 cup to start and if at this point you find it needs a bit more sweetness, add the remaining sugar and stir well.
Once off the heat, finish with the chopped chives (finely chopped scallions / green onion will work as well), honey and lemon or lime juice. Stir and enjoy. Once completely cooled, you may store it in a sealed container in the fridge for 2-3 weeks. As discussed in the video I used a SPICY Jerk Marinade, but if you’re shy about the heat, use your fav mild marinade.
To clear the air and hopefully avoid the waste-man comments, traditional shepherd’s Pie is made with GROUND LAMB and when you employ the use of GROUND BEEF it’s known as Cottage Pie! That said, should you refer to the video below, you’ll see me clearly say that this recipe is not traditional in any form, as I was merely using leftovers from the night before.
Notes. Please follow along with the video below as much more is explained within. As far as using the gravy, steak and mushrooms, it’s what I had leftovers (including the mashed potato) from the night before. Optionally you may fold in 1/2 cup (grated) of your fav cheese and I’m sure the “Caribbean” in you will want a teaspoon or so of Green Seasoning when you brown the grown beef.
Start with a wide nonstick pan on a medium flame and add the ground beef. You’ll notice that in the ingredients list I used the word ‘medium’. In Canada for the most part we have 3 grades of ground beef available. Regular (most fatty), Medium (less fat) and Lean, which as the name suggests, is lean. Since I used ground beef with a bit of fat, I used a dry pan to start. Should you decide on using lean beef, turkey or chicken, you’ll need to add a tablespoon or more of your fav oil to start.
Using my spatula to break up the beef as it brown, it took 7-10 minutes. I dislike chunky pieces of ground beef.
At this point I then added the leftover steak (cut into small pieces) and mushroom.
Then in went the onion, leaves of the thyme, black pepper and salt. Turn the heat down to med/low and cook for 3 minutes. Basically until the onion softens, then you’ll add the flour and stir well to cook-out the rawness of the flour. After 2-3 minutes add the tomato paste and cook for a further 2 minutes. I’m not a fan of Rosemary, but feel free to add a teaspoon or so of it (finely chopped).
If you’re not using gravy (leftover)you will need to add a bit more beef stock, in my case I added a cup and a 1/2, followed by the Worcestershire sauce. Add the frozen vegetables (corn, peas, beans and carrot), stir well and bring to a boil.
At this point I added the leftover gravy (it was a green peppercorn gravy banging with flavors so I didn’t want it to go to waste). BTW the addition of the pieces of grilled steak gave the finished pie a a gentle kiss of smoke from the grill.
Once it comes to a boil, reduce it to a simmer and cook for about 10 minutes.
Should you need to, add more beef stock.
Here’s where you’ll then taste and adjust the salt to your liking and determine how thick you want the sort of meat sauce. I reduced it by about 1/3.
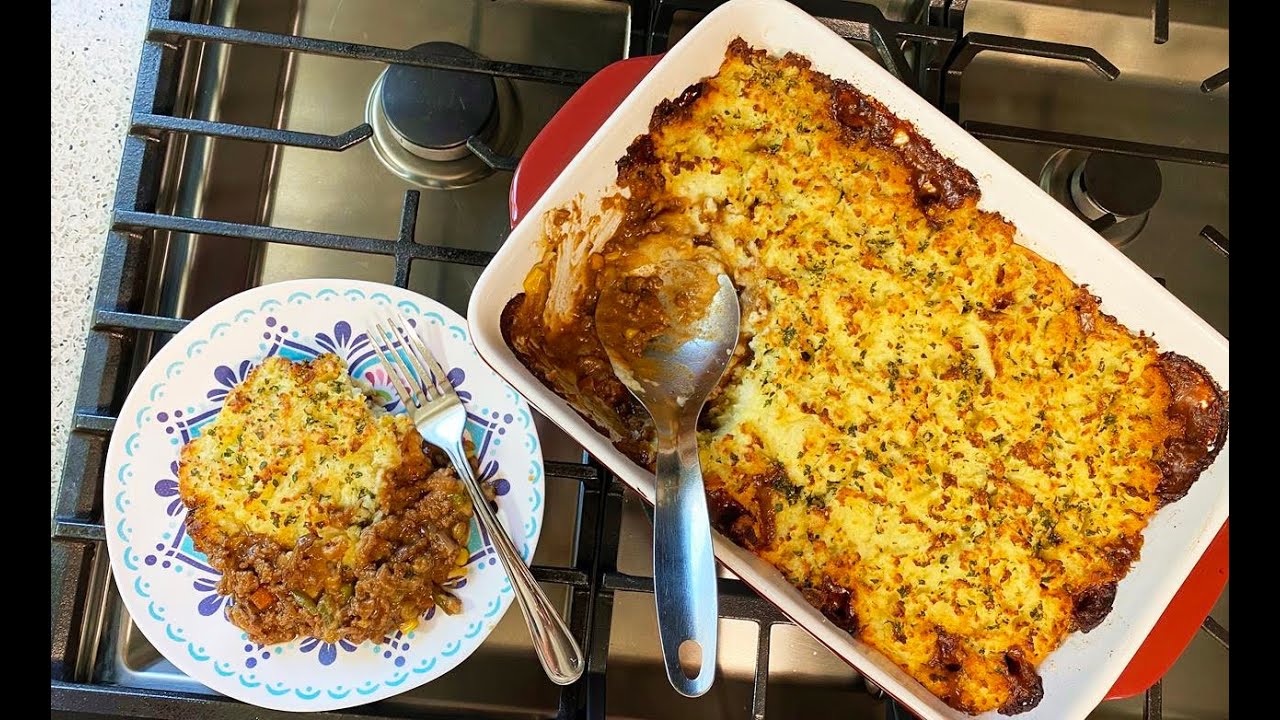
Pour the cooked beef into an eight by ten oven proof dish. Before we get ahead of ourselves, preheat the oven to 400F.
Scoop the mashed potato (room temp) onto the beef mixture but don’t smoothen yet. Combine the parsley with the parmesan cheese and sprinkle throughout the surface of the potato layer, then flatten. As mentioned in the video, I wanted ridges so the finished Shepherd’s Pie would take on a golden color.
With the risk of bubbling over, place the baking dish onto a cookie sheet or tray, then into the middle rack of the oven for 30 minutes (uncovered). Be sure to start checking its color after 25 minutes as your oven may run a bit hot. I used the convection setting on my oven, so I dropped the temp by about 10 degrees.
Once done (keep in mind that my mashed potato was salted and did contain milk, black pepper, butter and roasted garlic), allow it to rest for about 15-20 minutes before you dig in. I guarantee you that while this is NOT a traditional Shepherd’s pie, you’ll be very proud to serve this.
Growing up in the Caribbean, what we made and called Shepherd’s Pie, always had ground beef as I never recall ever seeing ground lamb being sold anywhere. Yes, even as a lil fella I would accompany mommy to the market and shops. Enjoy.
A hearty Caribbean-inspired take on the classic shepherd’s pie, using ground beef, leftover steak, and a medley of vegetables, all topped with creamy mashed potatoes.
Ingredients
Instructions
Video
Preheat the oven to 400°F (200°C).
In a wide nonstick sauté pan over medium heat, add the ground beef. Cook for 7–10 minutes, breaking it apart with a spatula until browned.
Add diced leftover steak and cooked mushrooms (if using) to the pan. Stir to combine.
Add diced onion, thyme leaves, black pepper, and salt. Reduce heat to medium-low and cook for 3 minutes until the onion softens.
Sprinkle in the flour and stir well to cook out the rawness, about 2–3 minutes.
Stir in tomato paste and cook for an additional 2 minutes.
Pour in 1 1/2 cups beef stock and Worcestershire sauce. Stir to combine.
Add mixed vegetables and bring the mixture to a boil.
If using, add leftover gravy to the pan. Reduce heat to a simmer and cook for about 10 minutes, allowing the mixture to thicken. Add more beef stock if needed.
Taste and adjust seasoning as necessary.
Pour the meat mixture into an 8×10-inch ovenproof baking dish.
Spoon the mashed potatoes over the meat mixture. Combine parmesan cheese and chopped parsley, then sprinkle over the mashed potatoes.
Create ridges on the mashed potato surface with a fork for a golden crust.
Place the baking dish on a cookie sheet or tray to catch any overflow. Bake uncovered in the preheated oven for 30 minutes, or until the top is golden brown.
Remove from oven and let rest for 15–20 minutes before serving.
As a lil fella growing up on the islands, Curry Duck was never my thing. It’s funny how in my adult years, every couple months I get a serious craving for it. There’s something so comforting about a plate of rice, dhal and spicy curry duck, with a side of mango kuchela or pepper choka. It’s why I included this recipe in my #ComfortFood series on YouTube.
You’ll Need…
8-10 lbs duck (trimmed and washed) 2 limes (juice) 3/4 tablespoon salt 1 teaspoon black pepper 1 tablespoon gound masla 1 large tomato (diced) 2 heaping tablespoons Caribbean Green Seasoning 1 tablespoon grated ginger 2 scotch bonnet peppers (sliced) 1-2 tablespoon olive oil 2 medium onion (sliced) 12-14 cloves garlic 1/2 tablespoon cumin seeds (geera) 3 tablespoon curry powder 8 cups water 1 tablespoon anchar masala 3 scallion (fine chopped) 3 tablespoon chopped parsley
Notes! May I recommend that you follow along with the video below as much more about the recipe is explained there. Should you be doing this gluten free, please go through the full list of ingredients to ensure they meet your specific gluten free dietary requirements. Especially the curry powder you use as some may have ‘fillers’.
This is one of those instances where I highly recommend that you season and marinate the meat before cooking. Best case scenario, overnight. However, if you’re pressed for time, at least 2 hours.
Get your butcher to cut the duck into small pieces as your cleaver or large knife will shatter the bones and you’ll have fragments to deal with. Some Caribbean butchers will even skin (remove the skin) the duck for you for a small charge. In my case I removed most of the skin and fat that I could (explained in the video) and washed the meat with the juice of the limes and cool water. After-which it was drained and ready for seasoning.
Season with the salt, black pepper, ground masala, curry powder, Caribbean Green Seasoning, tomato and grated ginger. Mix well, cover with plastic wrap and place the fridge to marinate.
Take it out of the fridge at least 30 minutes before you’re ready to begin cooking.
Heat the oil in a large/heavy pot on medium heat and add the onion, garlic and cumin (geera) seeds. Stir and cook on a med/low flame for 3-4 minutes.
Then add the curry powder and stir well. Turn the heat down to low and cook for 4-5 minutes to bloom the spices which make up the curry powder.
It’s now time to turn the heat up to med/high and add the seasoned duck to the pot. The goal is to coat the pieces of meat with that lovely curry base we created.
You will notice that it will sprout a lot of natural juices, that’s what we want. As it comes to a boil, reduce the heat to med/low and place the lid on slightly ajar. Cook for 20 minutes, stirring every 4-5 minutes.
At this point, remove the lid off the pot and turn the heat up to medium high to completely burn off that liquid. This will infuse the pieces of duck with that deep curry flavor. The goal as explained in the video is to see the oil we started with at the bottom of the pot.
Then you’ll add the water to the same bowl you marinated the duck in and swish it around to pick up any remaining marinade. This water is then added to the pot to slowly cook the duck until fork tender.
Add the anchar masala and stir. (use ground roasted cumin if you cannot source the anchar masala)
Bring it to a boil, then reduce to between a rolling boil and simmer and cook with the lid on slightly ajar for about 1 hour to 1 hour and 15 minutes. Stir occasionally and add more water if required. I explain why I don’t use ‘stock’ instead of water in the video. Adding coconut milk will change the flavor, but you may certainly add some if you wish.
Depending on the age of the duck it may be fork tender at this point. Taste and adjust the salt to your liking and once you’re happy with the consistency of the gravy and tenderness of the meat, add the chopped parsley and scallions and stir well. Turn off the stove, cover the pot and allow it to sit for about 5 minutes to allow the things to come together before serving. Optionally, you may use culantro (shado beni) or cilantro instead.
During the cooking process you could have added a stick of cinnamon and/or a couple bay leaves. At the end you may also add a teaspoon of ground roasted geera (cumin) for that extra POP of flavor. I did use 2 green scotch bonnet peppers when I seasoned the duck, however you may add less or more, depending how spicy you want the finished curry duck to be.
After adding the water it took about 70 minutes for my duck to be tender!
You just learned how to make delicious curry duck at home.
The traditional way this dish is made is with Dasheen Bush Bhagi (tender leaves of the Taro plant), however being in Canada means that securing decent Taro leaves is very challenging. Yes, I could drive to Toronto to the many West Indian grocers, but from experience I know that it’s insanely expensive and the quality is (most instances) terrible. Everyday baby spinach, which is easily sourced at any local grocery store is an excellent replacement.
You’ll Need…
1 tablespoon olive oil 2-3 lbs prepared salted pig tails 1 lemon (juice) 4 sprigs thyme 2 scallions (chopped) 1 pimento pepper (chopped) 1 small onion (sliced) 3/4 teaspoon black pepper 1 1/2 cups diced pumpkin 8 okra (ochro) chopped 1/2 lb baby spinach (chopped) 2 cup par-boiled brown rice (wash) 3/4 teaspoon salt (see note) 2 cups coconut milk 2 cups water 1 scotch bonnet pepper
Notes! May I recommend that you watch the video below to follow along as much more about the recipe is discussed there. Get your butcher to cut the pig tails for you or boil them whole (full lengths) and when tender, cut into smaller pieces. Even though the salted pig tails were boiled, there will still be remnants of salt which they were cured in. With that in mind, adjust the salt later on.
Before we get started we’ll need to boil the salted pig tail pieces for 1 hr and 15 minutes (as explained in the video) to help tenderize them and to remove most of the salt it was cured in. I had my butcher cut them into 1 1/2 inch pieces, which I washed with the juice of a lemon. Then they were boiled for 30 minutes, that water was then discarded and a fresh batch of water was used for the remaining cooking time.
In a deep pan add the oil on a medium/low flame, followed by the pre-cooked pigtail pieces. The goal is to render out some of the fat and in the process, get some of that flavor to start with. After 3-4 minutes add the onion, thyme, black pepper and scallions to the pan and cook for a further 4 minutes.
At this point we’ll add the diced pumpkin (squash will work as well) and okra to the pot.
We’ll follow this up with the washed and chopped spinach. It will look like a lot, however it will wilt down. Cook for 5 minutes.
I used par-boiled brown rice (washed). Add and stir well.
You’ll then add the coconut milk and water and bring to a boil.
I chose to float the Scotch Bonnet pepper as I wanted the flavors from the oils in the skin and not the raw heat. The goal is to NOT break the pepper while cooking, and fish it out at the end. If you want the finished spinach rice with a kick, you may chop the pepper and add it.
20 minutes later (cooked on a medium low heat) and it’s time to taste and add the salt if necessary. At this point I shut the stove off, placed the lid on the pot and allowed the residual heat to finish cooking things.
About 6 minutes later it was ready to be served. While I used salted pig tails, you may use salted beef or smoked turkey with similar results.
As explained in the video, depending on the type of rice you use, the amount of liquid you’ll need will differ as well as the cook time. White rice cooks quicker.
A little over 7 years ago I shared my Amazing 20 Minute Curry Chicken Recipe on YouTube and while that recipe is still very relevant. As we work our way through the #ComfortFood series I’ve been sharing on social media, I thought I’d revamp that recipe a bit. Unfortunately while filming the recipe video for this version, I never took step by step images as I would normally do.
You’ll Need…
3 lbs boneless chicken (dark meat) 2 tablespoon olive oil 1 medium onion (diced) 6-8 cloves garlic (smashed) 1 medium tomato (diced) 1/2 teaspoon black pepper 1 large scotch bonnet pepper (sliced) 1 teaspoon ground roasted cumin (geera) 1 1/2 tablespoon Caribbean Green Seasoning 2 tablespoon Curry powder 1 teaspoon Anchar Masala 3/4 teaspoon salt (adjust) 2 cups water 2 tablespoon chopped Shado Beni (chadon beni / culantro)
you may use cilantro
Notes. Please use the video below to follow along as much more is discussed there. Especially why I used boneless leg and thigh, but also why you may use chicken breast should you prefer that cut.
Cut the chicken into 1 to 1 1/2 inch pieces and wash with cool water and the juice of a lemon, lime or 1 cup white vinegar. Drain dry. If washing chicken is not your thing, you may skip this step as I know many people are opposed to this.. in my culture it’s a MUST!
Heat the oil in a heavy pan on medium heat. Unlike other curry recipes I’ve shared where we lower the heat at this stage, the goal is to maintain a constant heat. Add the onion, garlic, tomato, Caribbean Green Seasoning, Scotch Bonnet Pepper (use as much as you can handle) black pepper and roasted geera (cumin). Cook for 2 minutes, then add the curry powder, along with the Anchar Masala and stir well. Cook for a further 3 minutes.
It’s then time to add the chicken pieces and stir well to coat with the lovely curry base we created. Cook for 5 minutes, then add the salt and water (bring to a boil) and cook for a further 10 minutes.
At this point we’ll personalize things by adjusting the salt to your liking and determine if the gravy’s consistency is to your liking. Keep in mind that the residual heat in the pan will further thicken the gravy or sauce as it cools.
Once you’re happy with everything, turn off the heat and add the chopped Shado Beni (culantro) and stir. Should you prefer to use cilantro (coriander), it’s really up to you.
If you want to change up the flavors a bit you may add a bit of coconut milk or cream, a small stick of cinnamon, a bay leaf and/or a teaspoon of grated ginger will not hurt things at all! This recipe is true to a traditional Trinbago (Trinidad and Tobago) curry chicken.
I’m a huge fan of Guyanese Style Chow Mein and while this is not such a recipe, you will see some similarities in this version. If you grew up in Jamaica, Guyana or Trinidad and Tobago (where Chinese Indentured Labourers “settled”) you grew up being exposed to excellent Chinese food, so it’s common for us to boast about our version of Chinese food.
You’ll Need…
2 lbs chicken breast (boneless) 1/2 teaspoon salt 1/2 teaspoon black pepper 3 tablespoon veg oil (divided) 1 medium onion (sliced) 2 cups bell peppers (rough chopped) 1/4 lb mushrooms (sliced) 3 cloves garlic (diced) 1/4 lb veg mix (kale, carrot, purple cabbage and brussels sprouts) 1 tablespoon grated ginger 1 tablespoon sweet chili sauce (optional) 1 tablespoon Hoisin sauce 1 Tablespoon Oyster sauce 1 tablespoon Mushroom Flavor Soy Sauce 1 package Chow Mein noodles | 1 teaspoon veg oil 1/4 cup water | 1 teaspoon Sesame Oil (add more?)
Note! Please use the video below as a guide to follow along as much more about the recipe is discussed there. If you want to add a kick to the Chow Mein, feel free to add a couple diced bird’s eye peppers or a teaspoon of your fave peppersauce. Should you want, you may marinate the chicken breast with a teaspoon of Caribbean Green Seasoning. I didn’t as explained in the video.
Heat 1 tablespoon of oil in a pan on a med/low flame. Season the chicken breast with salt and black pepper and add it to the pan. Cook for about 10-12 minutes (until fully cooked) and then set aside to cool. Be sure to flip them every 3 minutes while cooking so they cook evenly. I used chicken breast, but thighs are an excellent option as well.
As mentioned in the video I used a Guyanese style noodles for this recipe. Basically I cooked it according to the package instructions, except I cut back the cook time as explained in the video. As you drain it, rinse the noodles with cold water. Drain, then mix in one teaspoon of veg oil and toss. This will stop the cooking process and stop the noodles from clumping. Set aside.
Let’s create the sauce we’ll be using to pull everything together. In a bowl combine the Hoisin, Oyster and Soy sauces. Then add the grated ginger and Sweet Chili sauce. You may leave out that sweet chili sauce if you want, but may I recommend that you put 1 teaspoon of white sugar.
Heat the remaining 2 tablespoons of oil in a wide pan or wok on a medium flame, then add the onion, bell peppers and sliced mushrooms. Stir well and if you’re using a wok, make use of the side of the work to spread things out so they cook evenly.
I cheated and used a pre-packaged bag of vegetable mix (rinsed). But you may opt to use any vegetables you have on hand or prefer. Typically I’d use chopped cabbage, scallions and broccoli. After 3 minutes, you may add the other vegetables and stir well. Add the garlic at this point as well, so we don’t risk burning it.
2 minutes after adding the vegetable mix, create an opening in the center of the wok and pour in the sauce mix we created. Swish around 1/4 cup of water in the same sauce bowl to rinse it and pour into the wok. We’re essentially heating the sauce.
Slice the chicken and add it to the wok, give everything a good mix at this point.
After a minute or so, add the precooked noodles to the wok and again, mix well!
After 2-3 minutes everything should be heated through and coated with the wicked sauce we created. You’ll notice that the only salt we added was when we cooked the chicken. The sauces we combine will have a sodium element to them, so this is when you should taste the Chow Mein and adjust the salt to your liking. I forgot to mention that when we added the onion etc to the wok, you may add 1/2 teaspoon white pepper if you wanted. I’m not a fan of white pepper.
It’s important that you prep your ingredients in advance as this is a quick dish to put together. As you turn off the stove, drizzle on the Sesame oil and give it a final stir.